
This classic muscle flap is now being used with increasing frequency following revision knee joint surgery. Following the Nahai and Mathes classification, the gastrocnemius muscle is a Type I muscle with a single dominant vascular pedicle (Figure 1). The gastrocnemius muscle lies in the upper posterior lower leg and forms the superficial bulge of the calf. There are two bellies to the muscle and these are separated by the sural nerve (Figure 2). From a planning perspective the medial gastrocnemius muscle is about the same size as the ulna half of the patient’s hand, being roughly 15cm long and 7cm wide in the average adult (Figure 3).
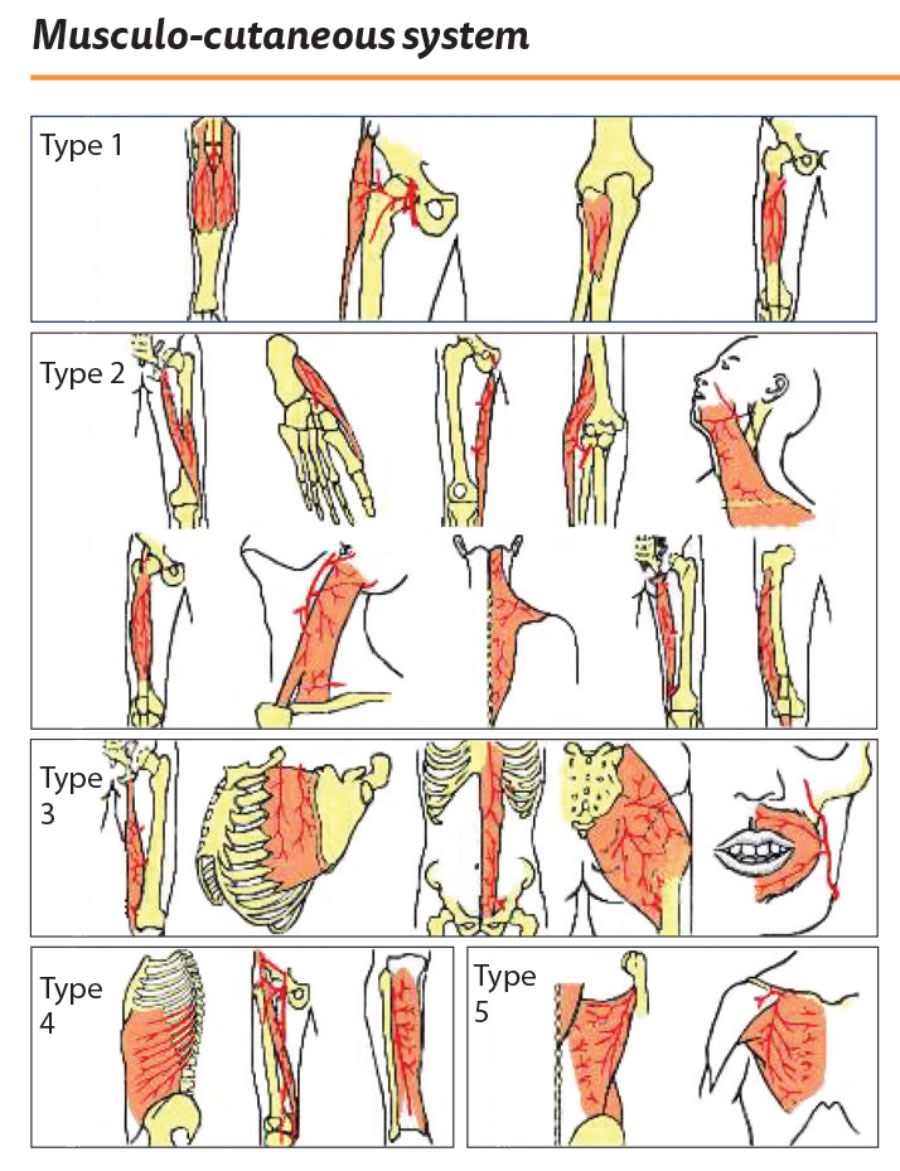
Figure 1.
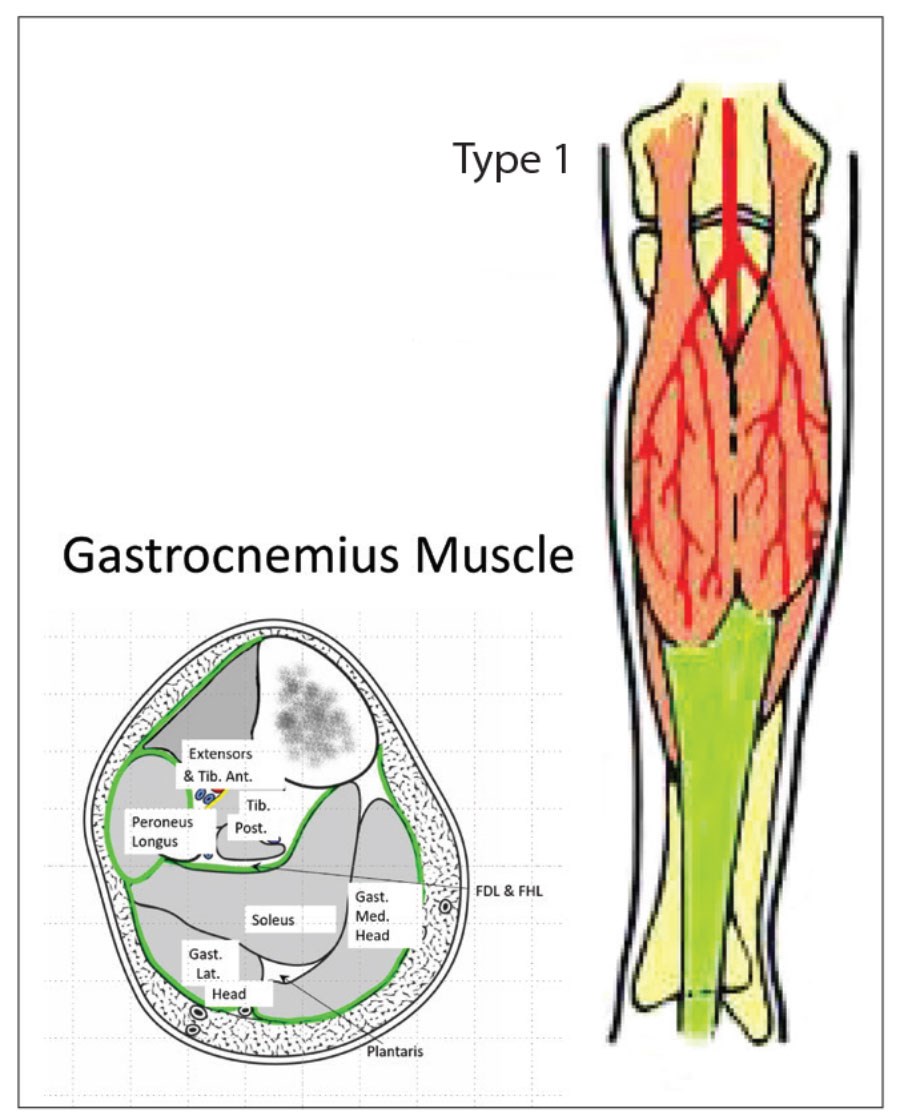
Figure 2.
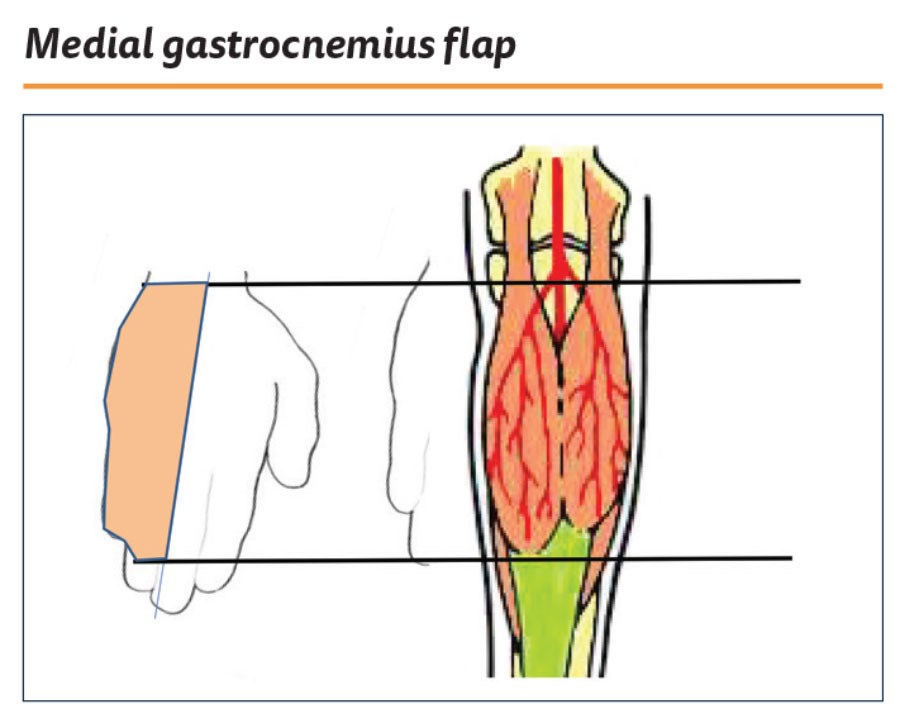
Figure 3.
In this operative series, there is a skin and bone defect in the upper anterior tibia (Figure 4). The bone is excised and the defect irrigated. The surrounding scarred and adherent skin is excised to create the soft tissue defect (Figure 5).
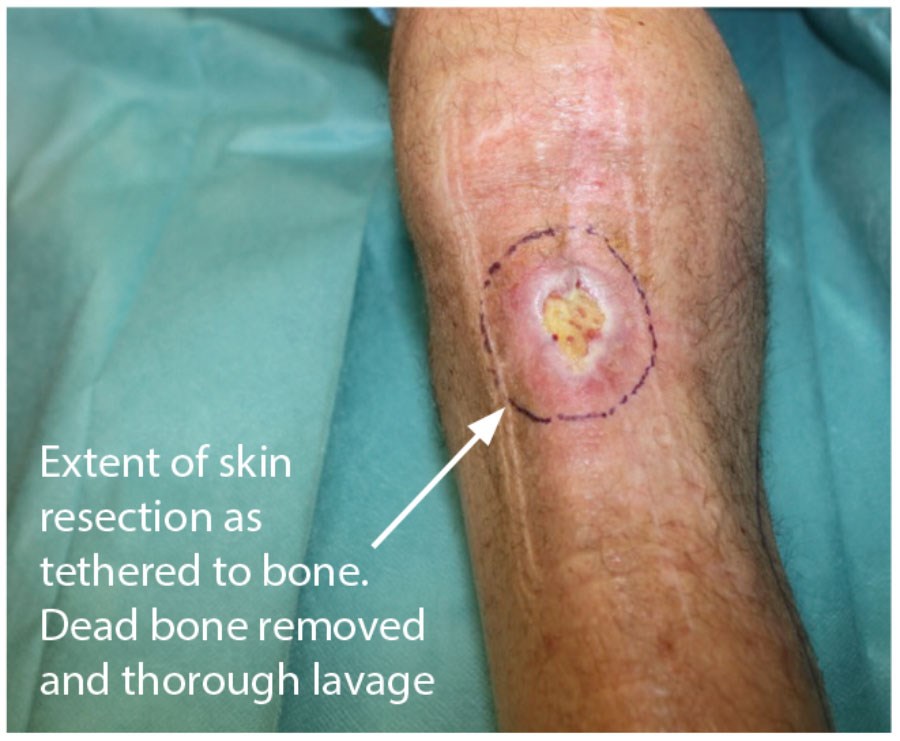
Figure 4.
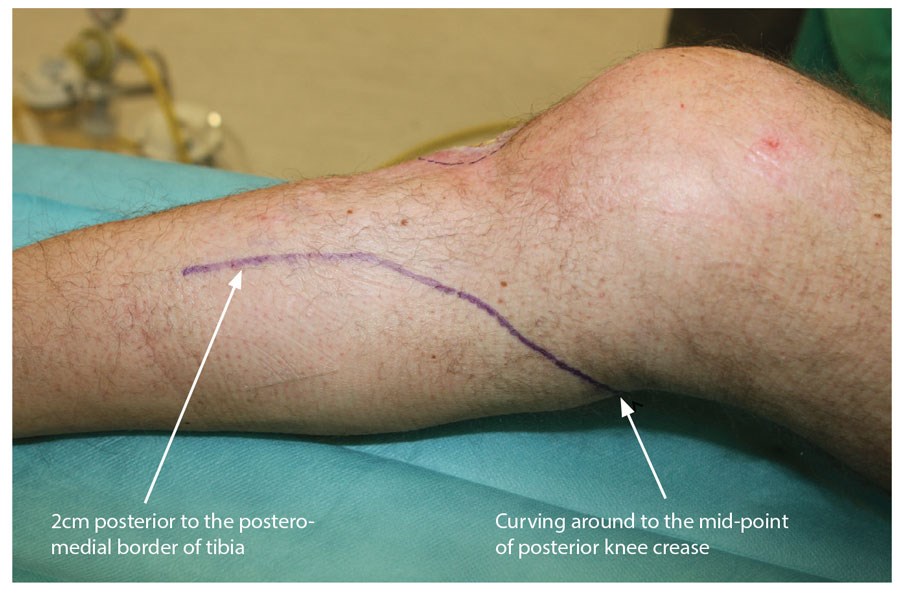
Figure 5.
The operation proceeds with the patient in the supine position and the leg externally rotated and a tourniquet applied. A curvilinear incision is marked on the skin. It commences 2cm behind the postero-medial border of the tibia and curves into the popliteal fossa (Figure 6). The skin is incised, longitudinal veins identified and ligated and the deep fascia is exposed. The deep fascia is incised and the plane between the fascia and the muscle is developed. The most useful instrument at this stage is the educated index finger. Any resistance to developing the plane between the muscle and the fascia will reveal a perforator bundle that needs to be ligated. The incision in the skin and fascia is lengthened as appropriate to allow visualisation of the distal end of the muscle. The muscle is then divided at the tendinous insertion and mobilised from the deep surface. As the midline is approached the sural nerve will appear, marking the lateral extent of the medial belly (Figure 6).
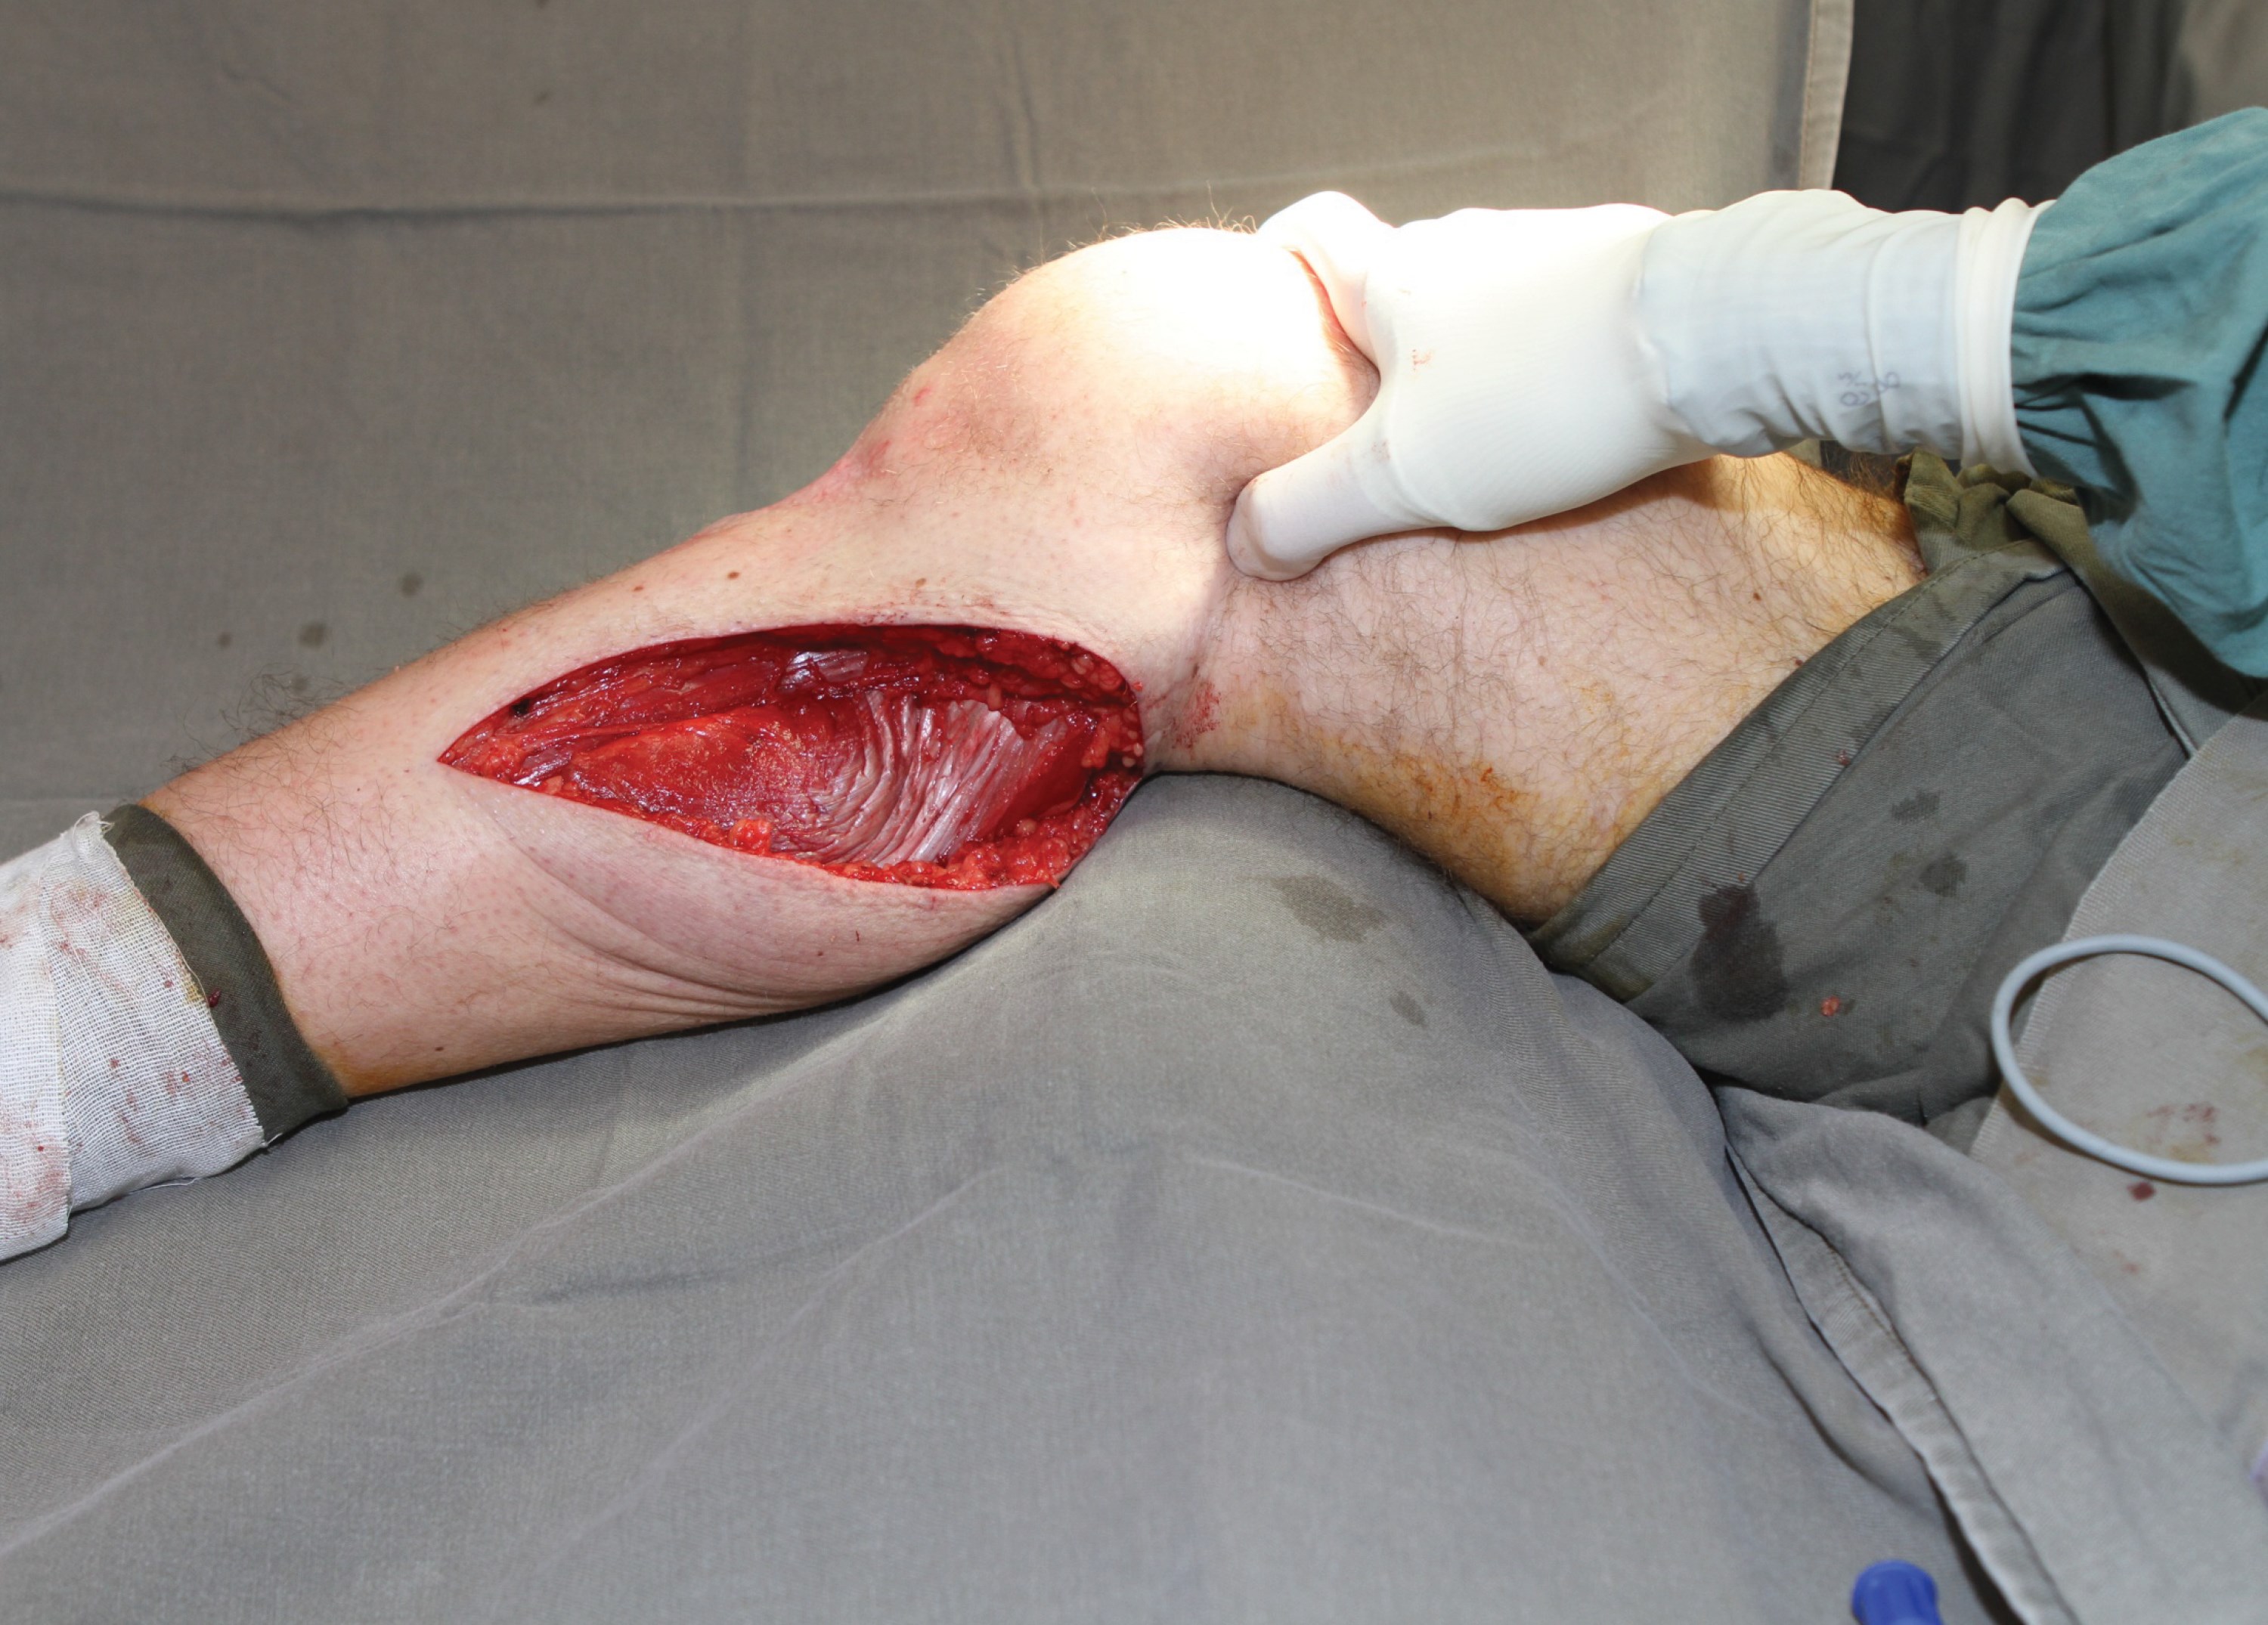
Figure 6.
The muscle is gently mobilised proximally and the access incision extended accordingly. Good retraction will allow visualisation of the neurovascular pedicle and the muscle denervated. This is an ideal but not mandatory step. The muscle is then delivered from the wound and the extent of reach determined by external transposition (Figures 7 and 8). A tunnel is created initially subfascial and then breaking through the deep fascia to become subcutaneous at the medial border of the defect. The tunnel needs to be wide and tension free and the muscle passed through. A suture can be passed through the tendinous tip of the muscle flap and then, using a combination of gentle traction and proximal manipulation, the muscle can be transposed. Care must be taken to ensure no tension on the pedicle nor on the muscle in the tunnel (Figure 9 and 10).
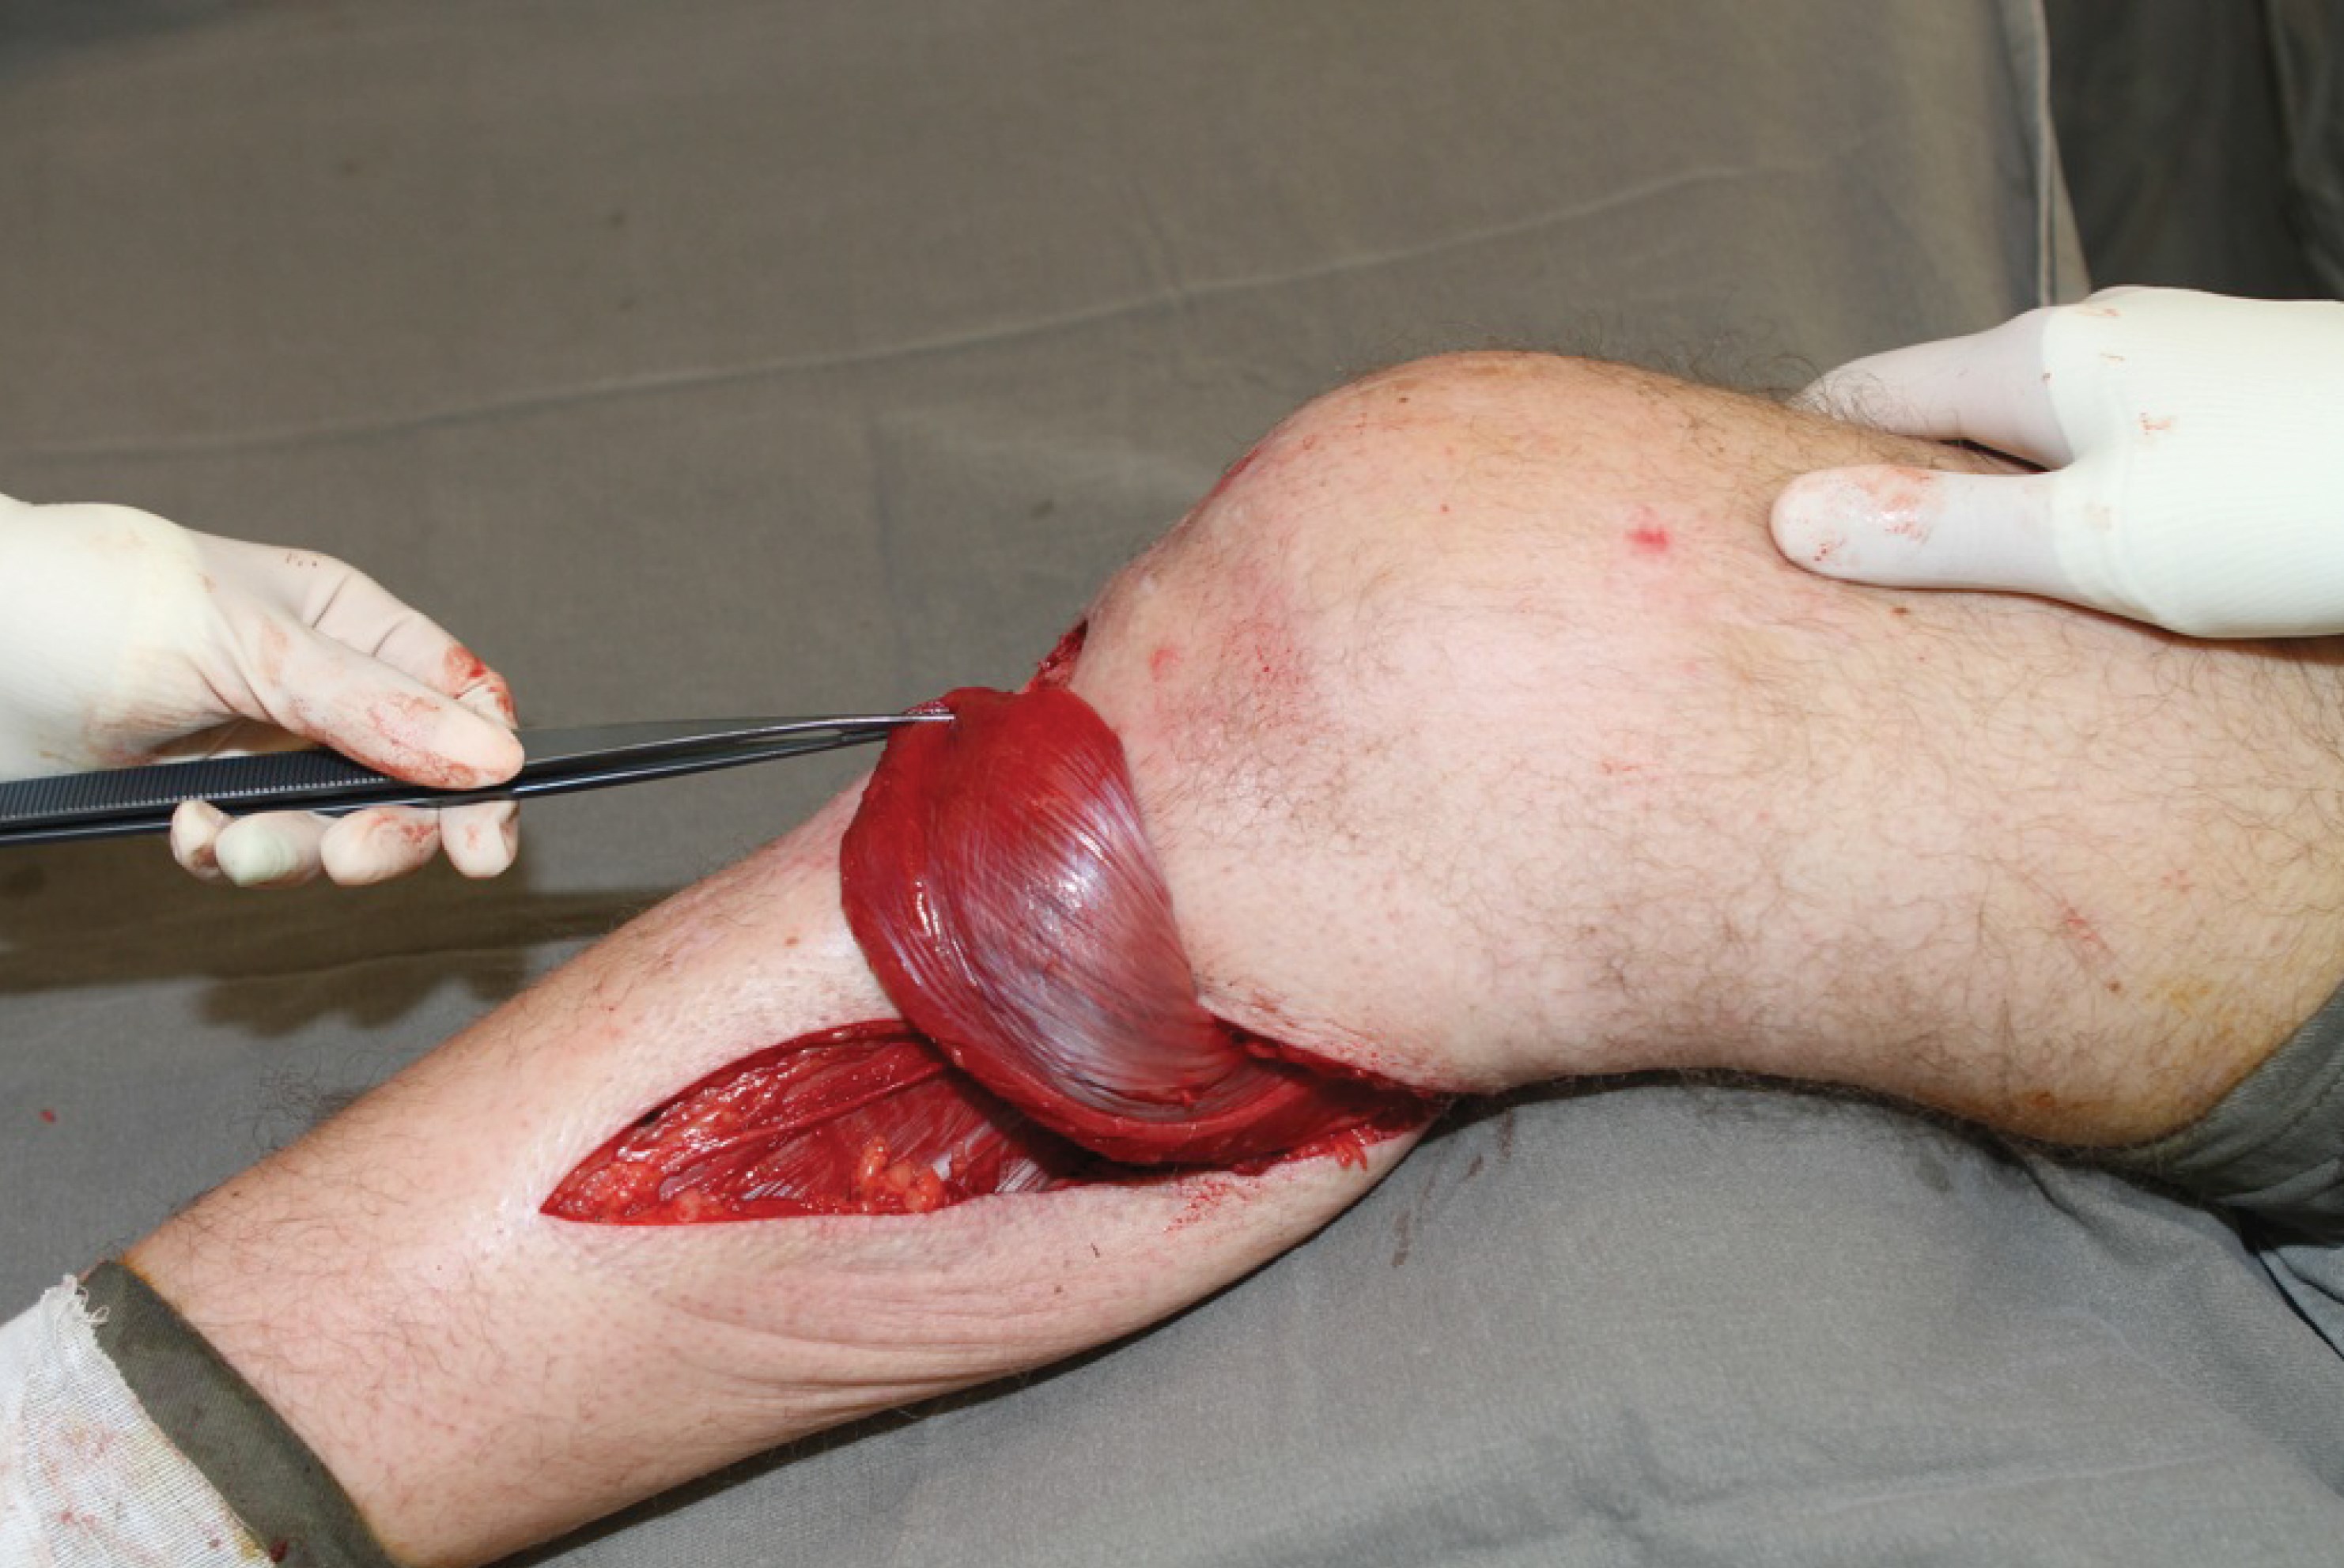
Figure 7: Medial belly raised and denervated. Proximal insertion NOT divided.
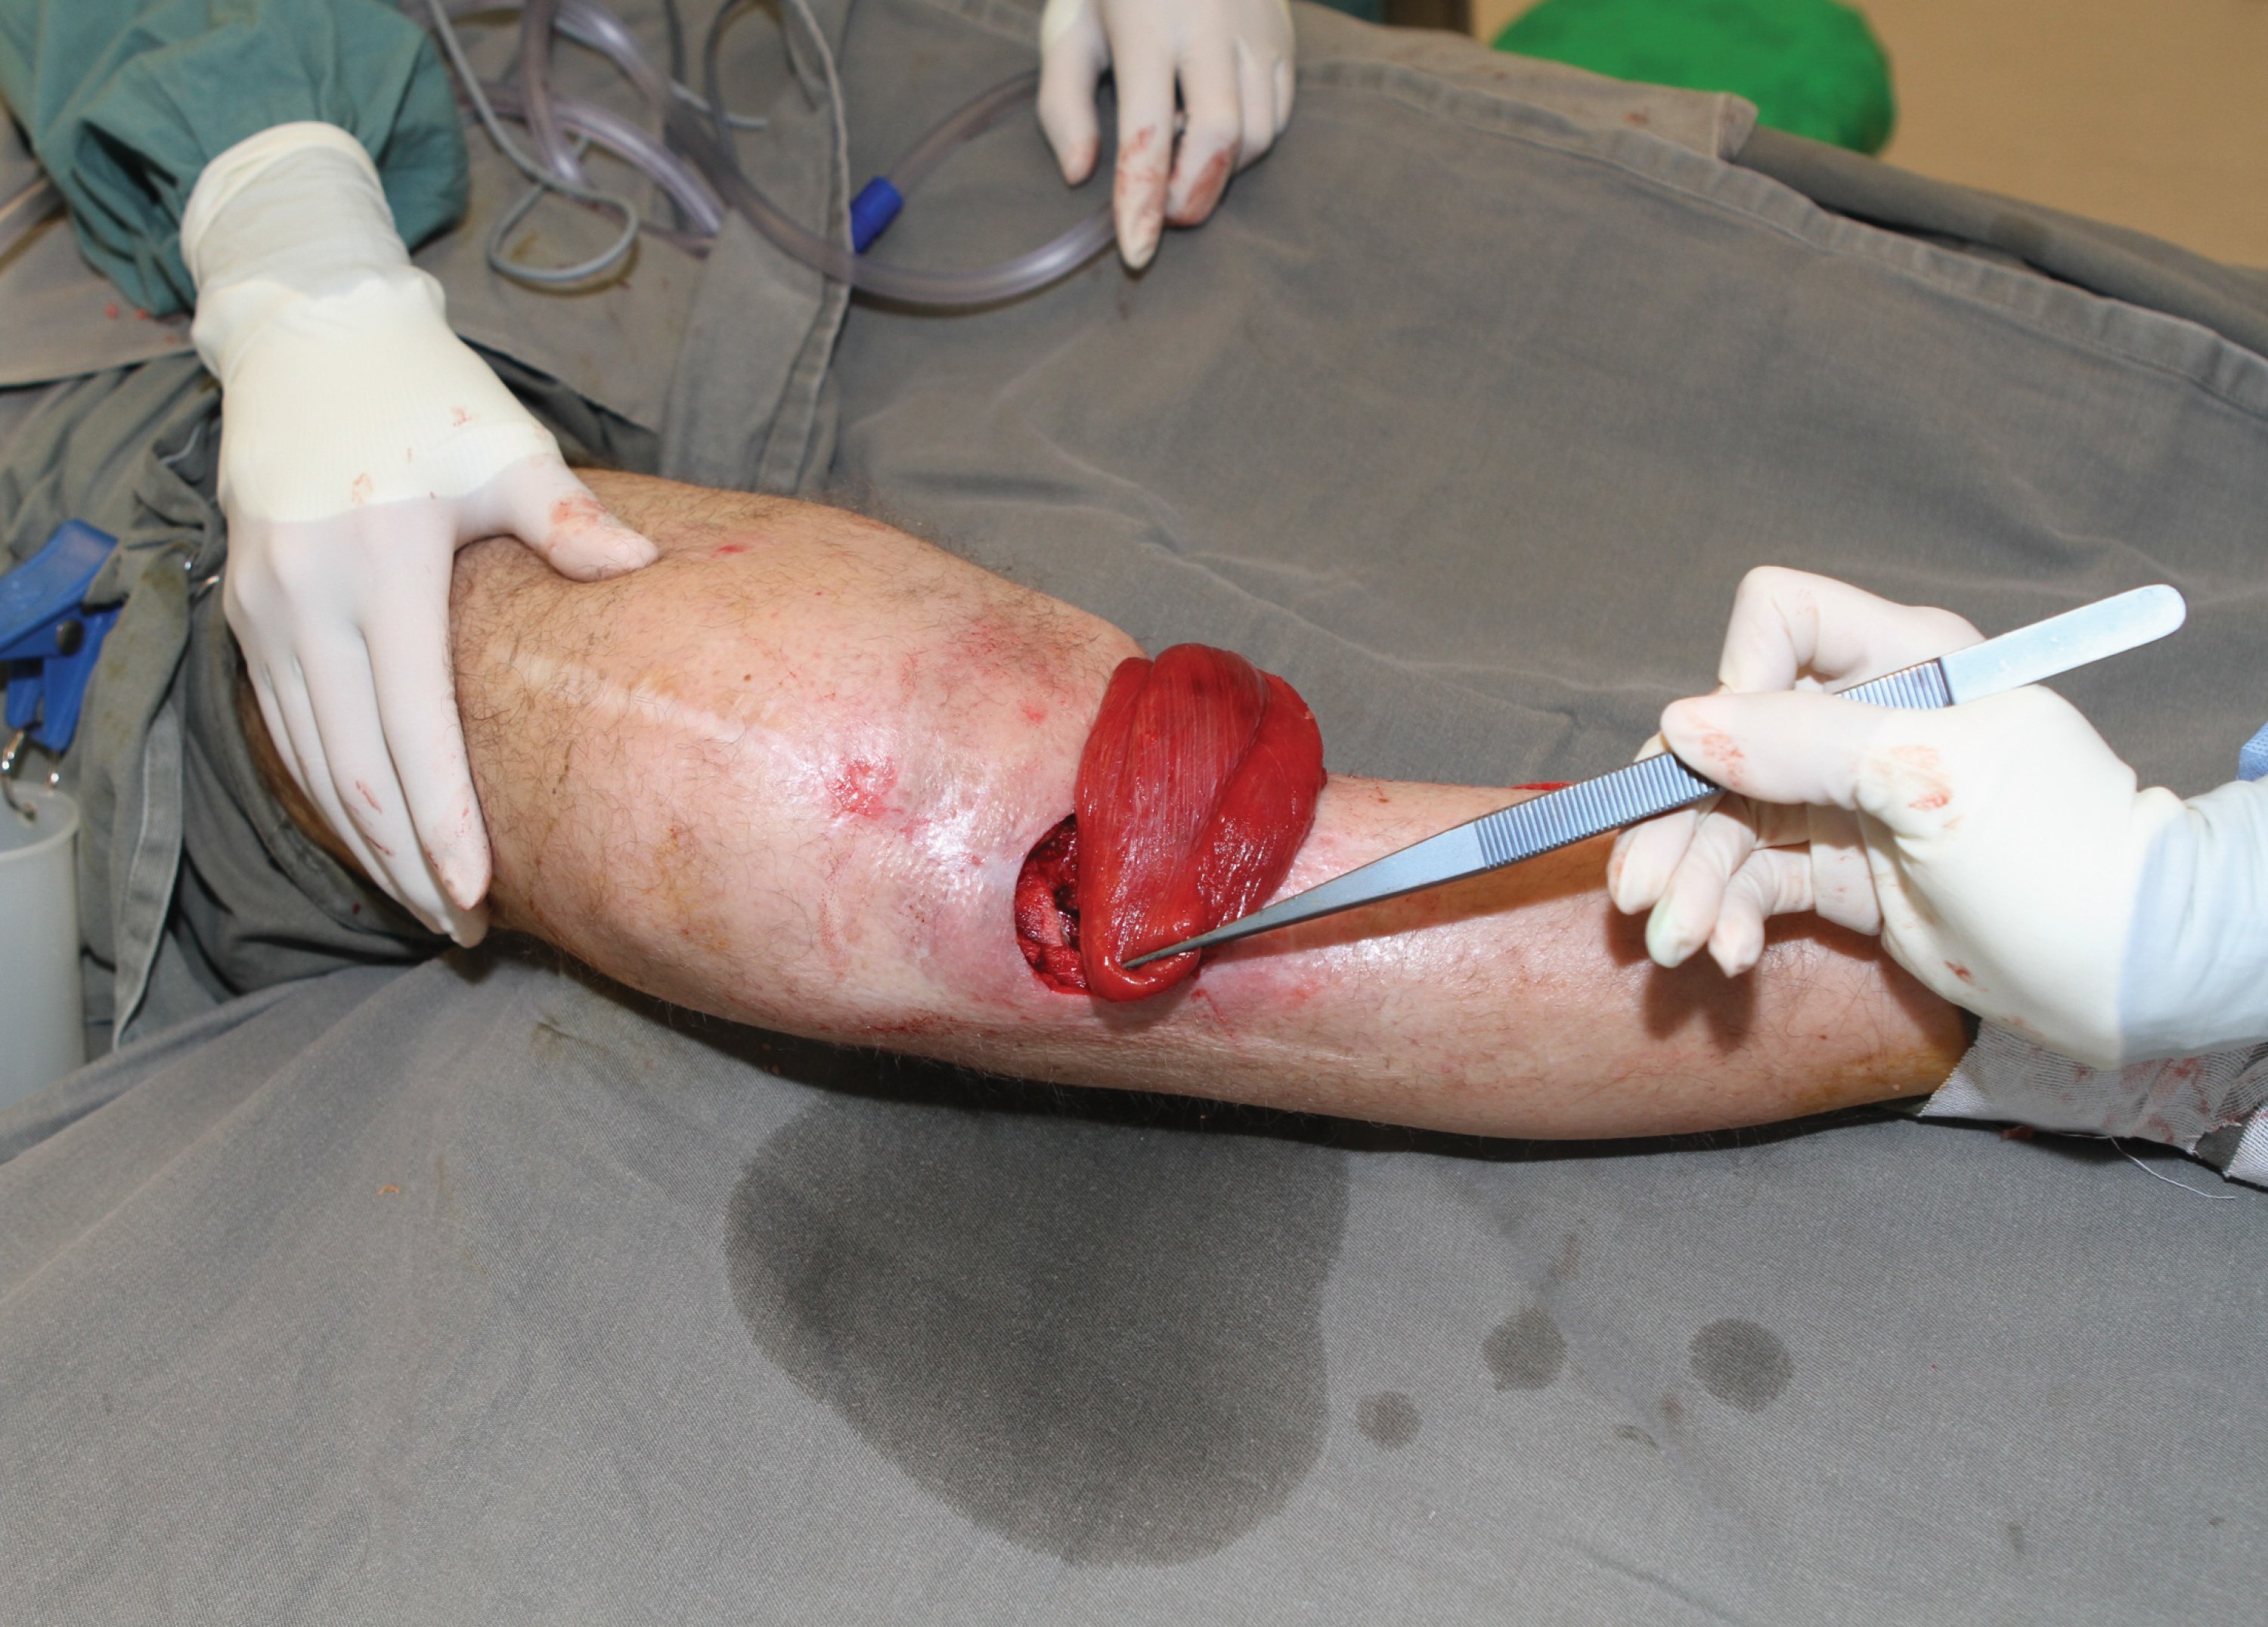
Figure 8.
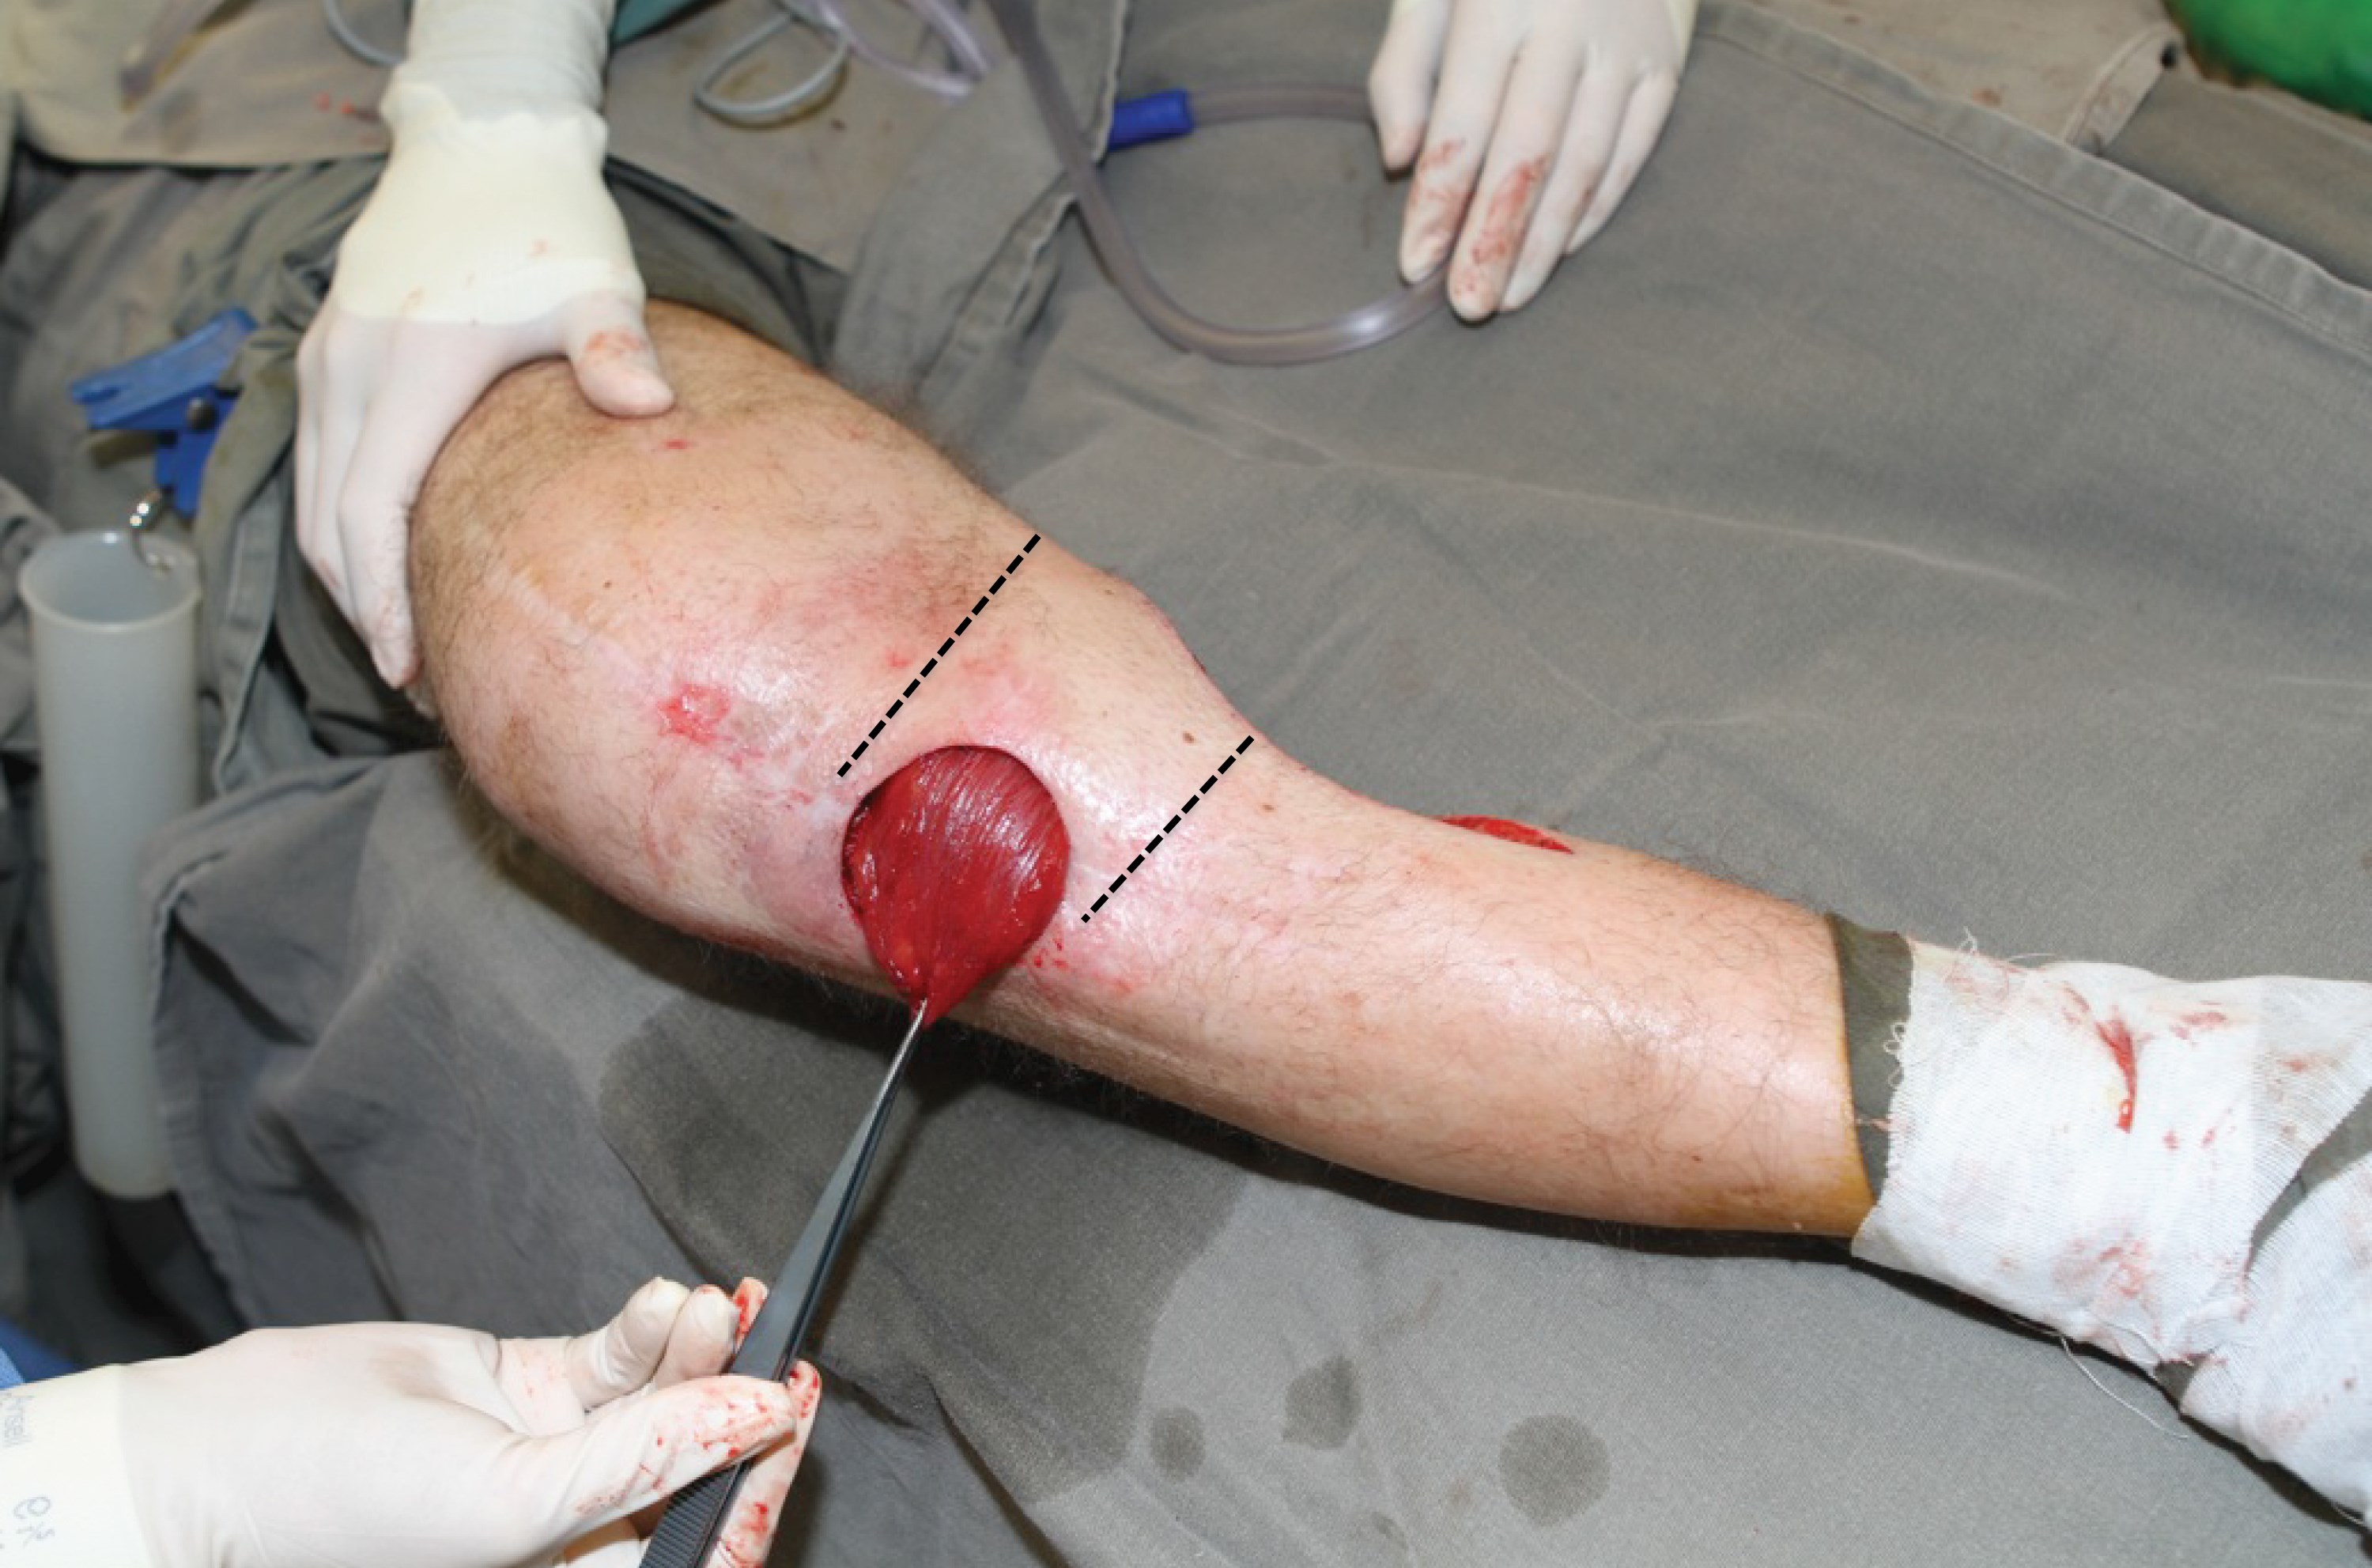
Figure 9: Wide tunnel created to allow tension free transposition.
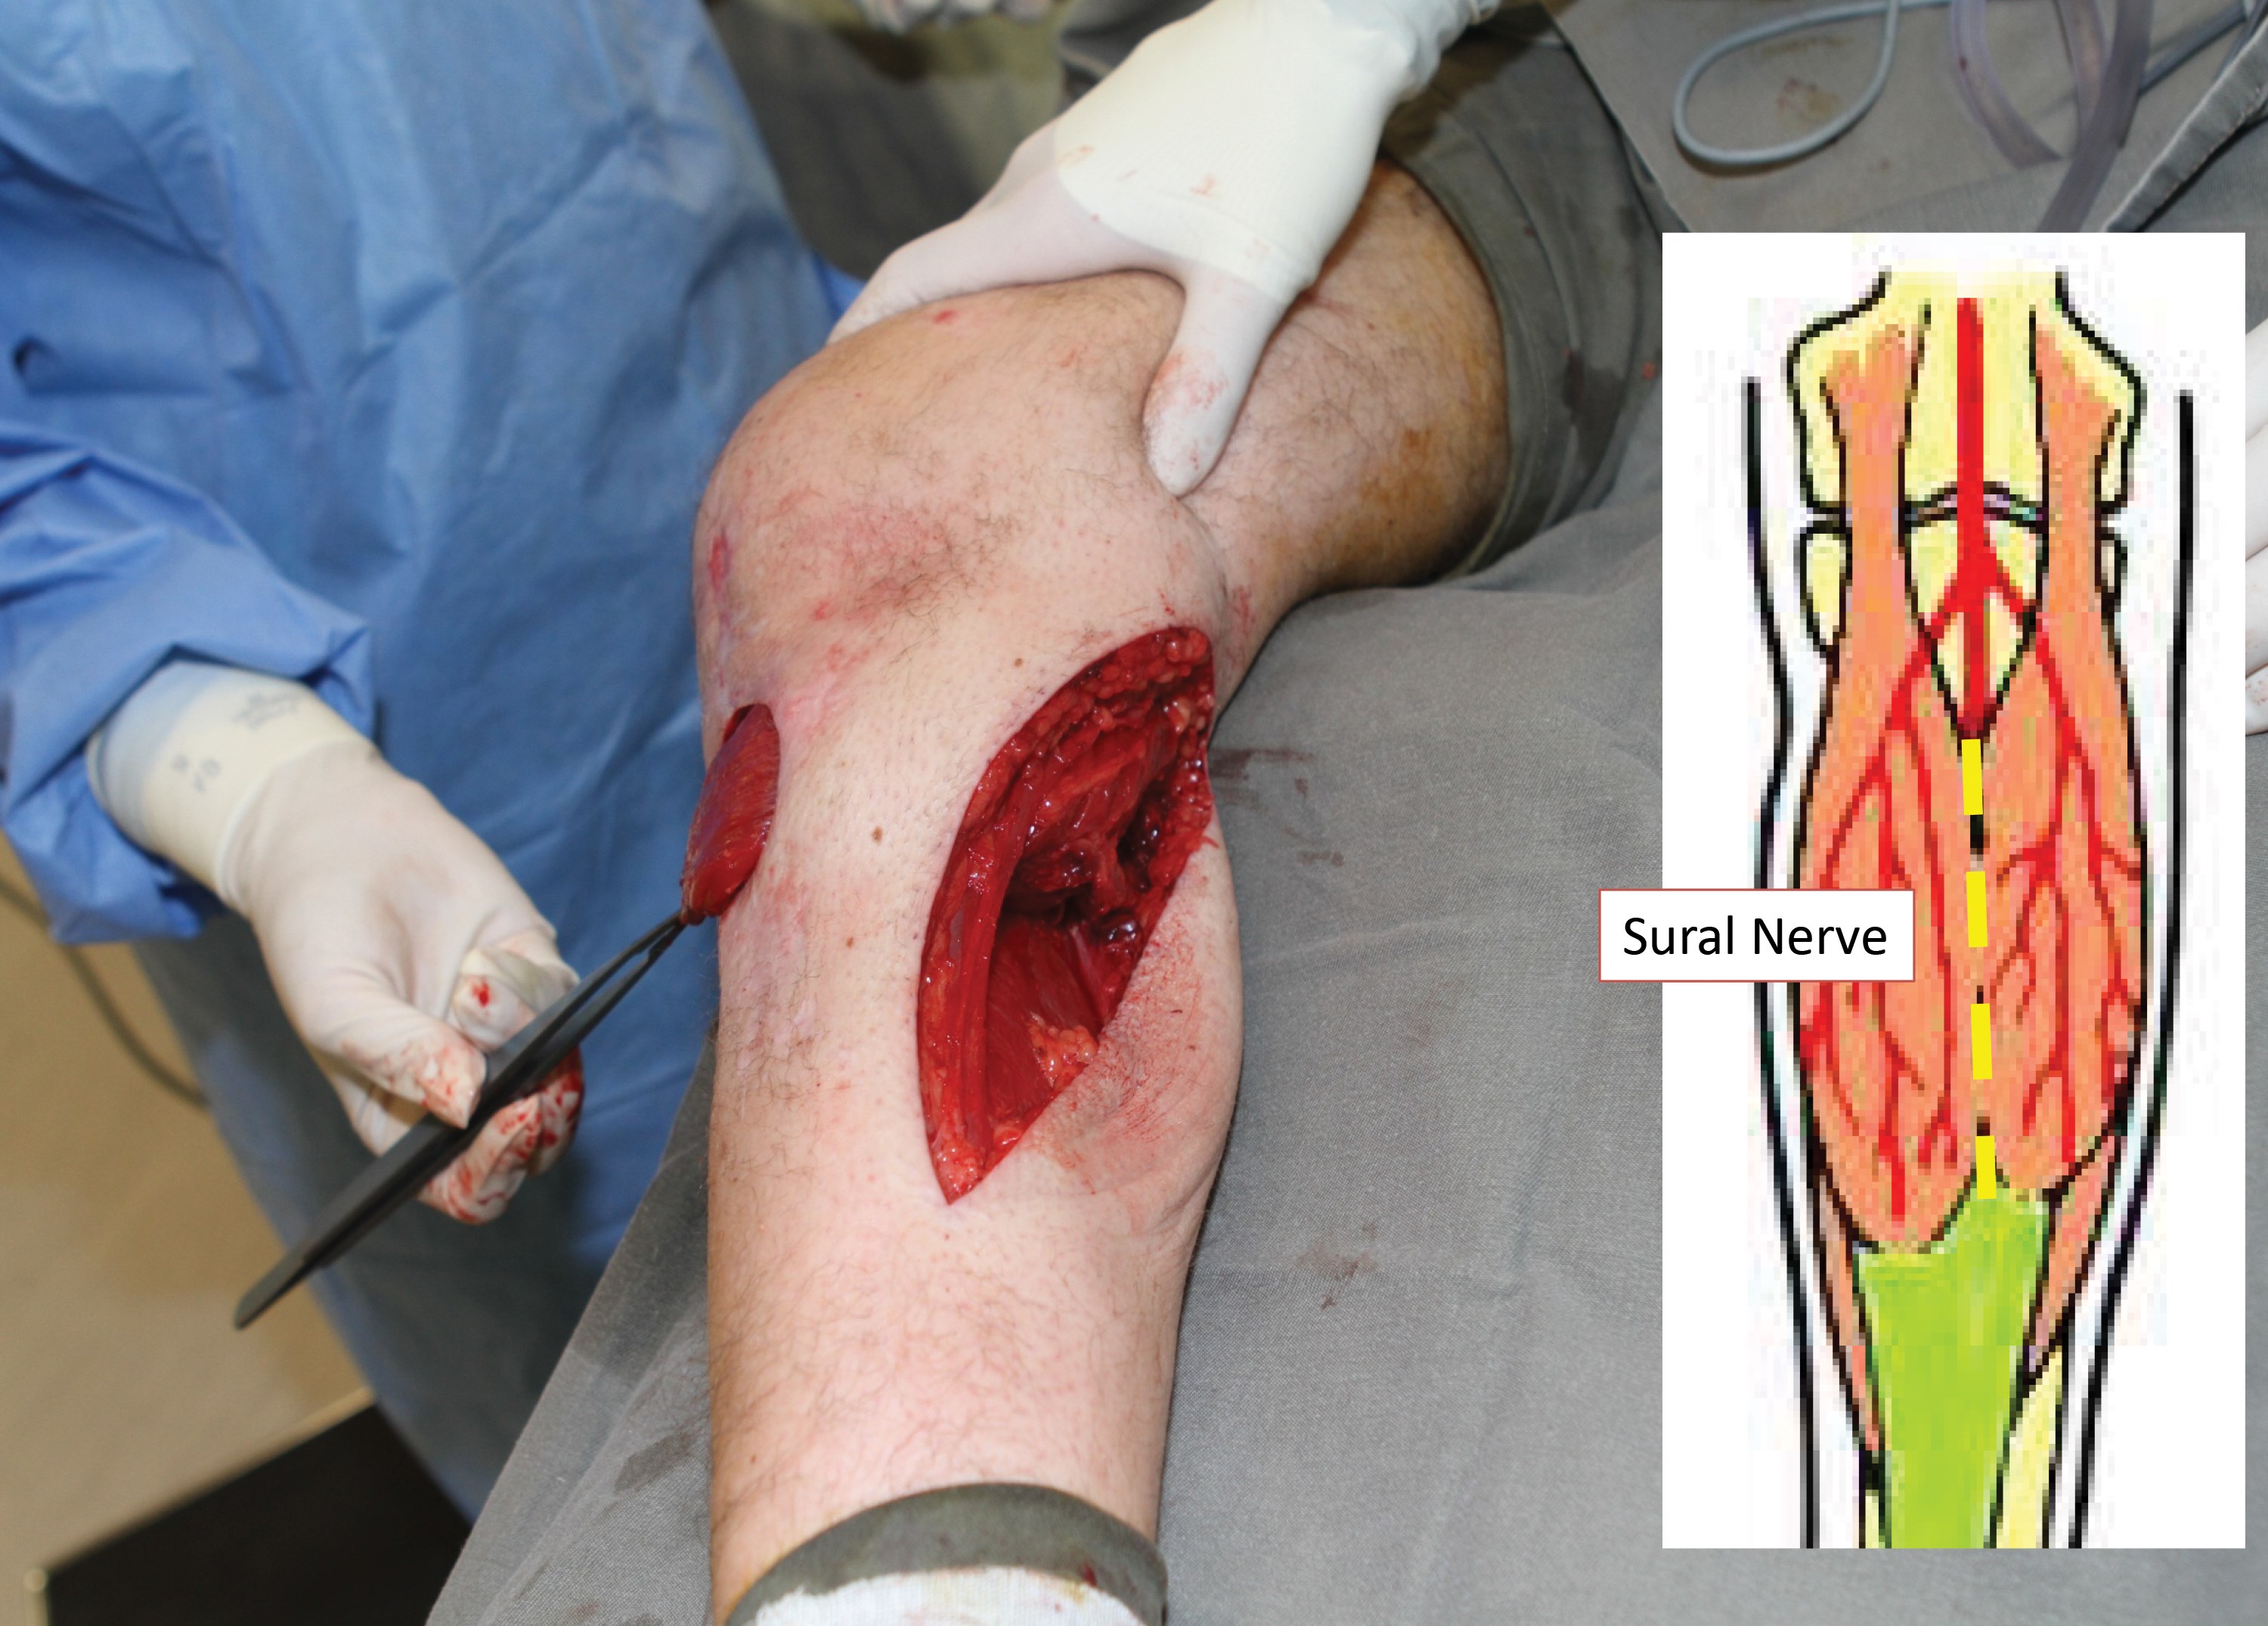
Figure 10.
At this stage the muscle is returned to the anatomical position and the tourniquet deflated. After appropriate haemostasis, the muscle is transposed and the leading edge is fed under the elevated skin defect margins. The muscle is fixed with three or four ‘U’ absorbable sutures (I use 3.0 vicryl). These can be inserted and cut and clipped before tying. The muscle is then covered with a split thickness skin graft that can be fixed with glue (Figure 11). The medial incision is closed over a large drain (Figure 12). Typically, the graft is covered with a non-adherent dressing and the leg dressed with wool and crepe. As always, the catechism, ‘tight but not too tight, loose but not too loose’ applies and bandaging must include the foot.
“This is a flap that all trainees should be familiar with as it is quick and easy to raise and is likely to be increasingly needed in the ageing population”
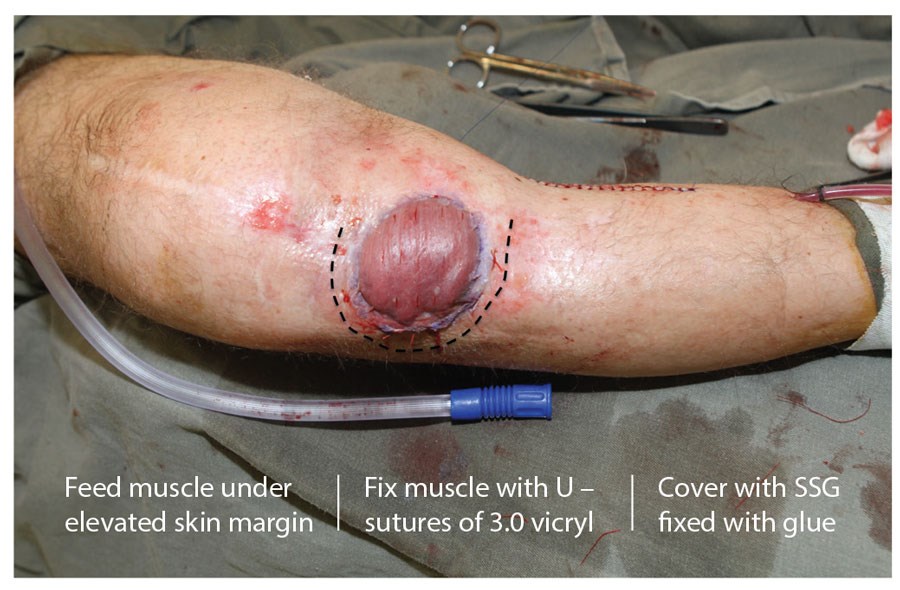
Figure 11.
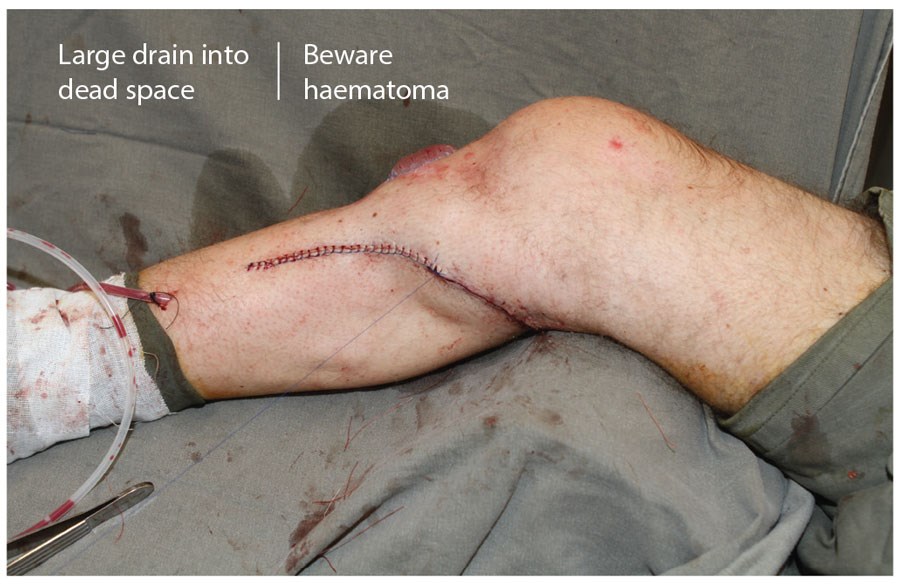
Figure 12.
The drain is left until the drain is less than 10mls in 24 hours and the graft is inspected at four days and then redressed. Sutures can be removed at 14 days postoperatively (Figure 13 and 14). The result is both aesthetically and functionally acceptable. This is a flap that all trainees should be familiar with as it is quick and easy to raise and is likely to be increasingly needed in the ageing population.

Figure 13: Four days post-op. Graft adherent… redressed
with double layer of bactigras, wool, crepe.
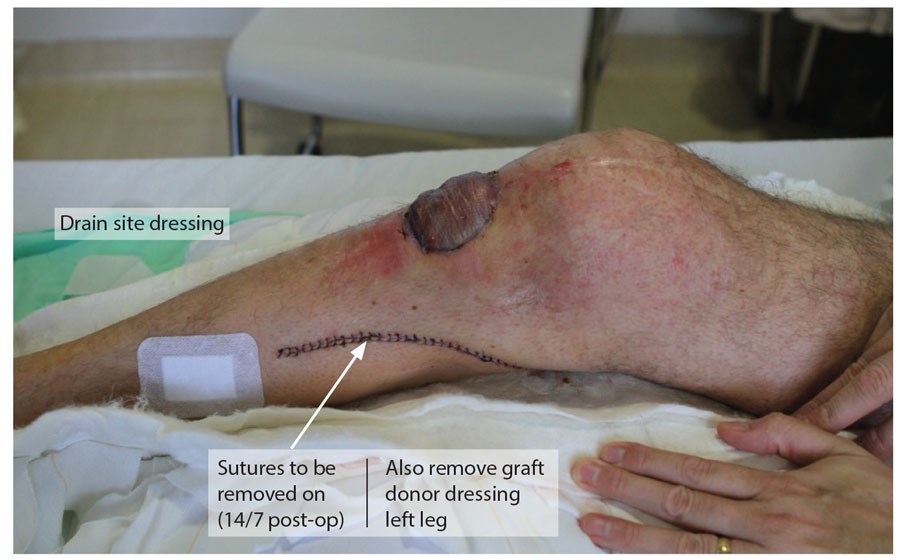
Figure 14.
Case studies
The myocutaneous flap. My first experience of this flap was as the on-call junior one Boxing Day (many years ago). A dear old lady living alone had been given a box of chocolates for Christmas. She was a diabetic and looked at them all day but resisted the temptation to indulge. The next day, however, she weakened and after eating all the chocolates fell into a hyperglycaemic coma. She sustained a full thickness burn of her left knee. In fact, because of the ‘slow cook’ the burn went down to the patella. The defect was large, the patient was unstable and only a spinal could be performed. The defect was too large for a muscle flap so I raised a large lateral myo-cutaneous flap based on the lateral muscle belly. The donor site needed grafting and it did not look great but it was functional and the patient was very happy (Figure 15).
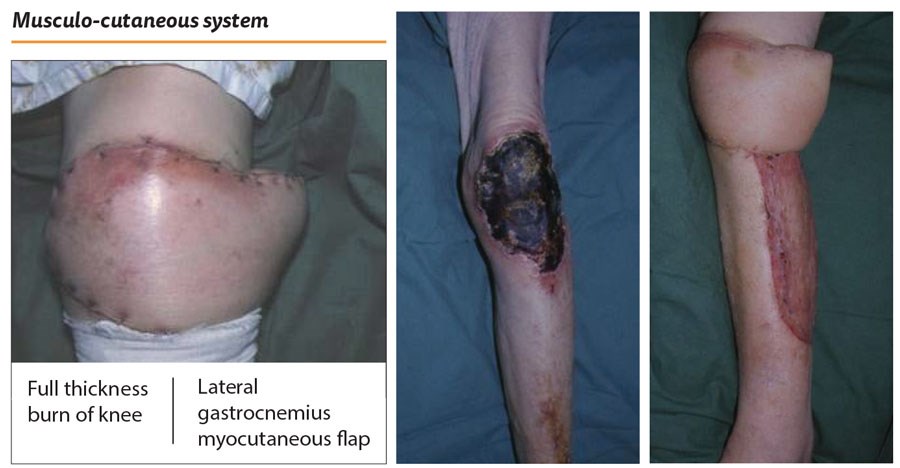
Figure 15.
Exactly one year later, I was on call again, and the same story. This time however, the lady burned through her flap (Figure 16). What to do? This is the beauty of the gastrocnemius muscle and I raised a medially based myocutaneous flap. Not great looking, but again it served the purpose of getting the wound closed and the patient home (Figure 17).
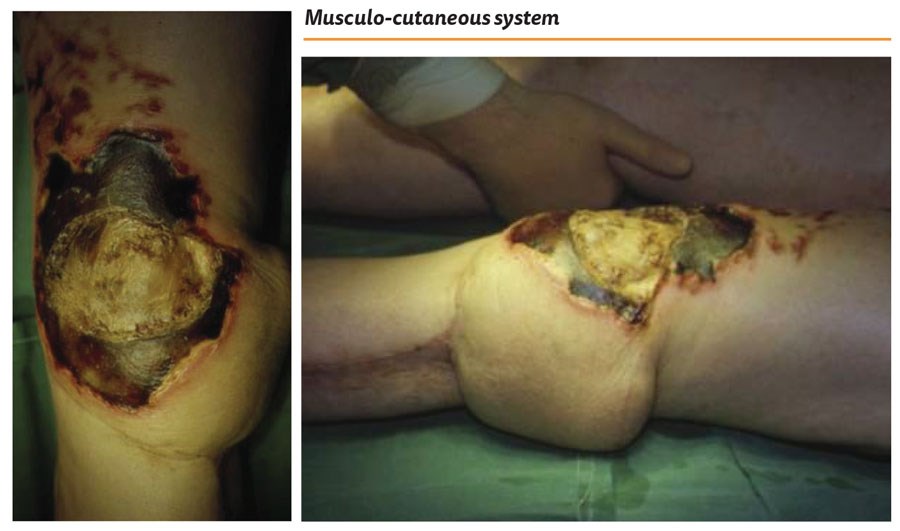
Figure 16.
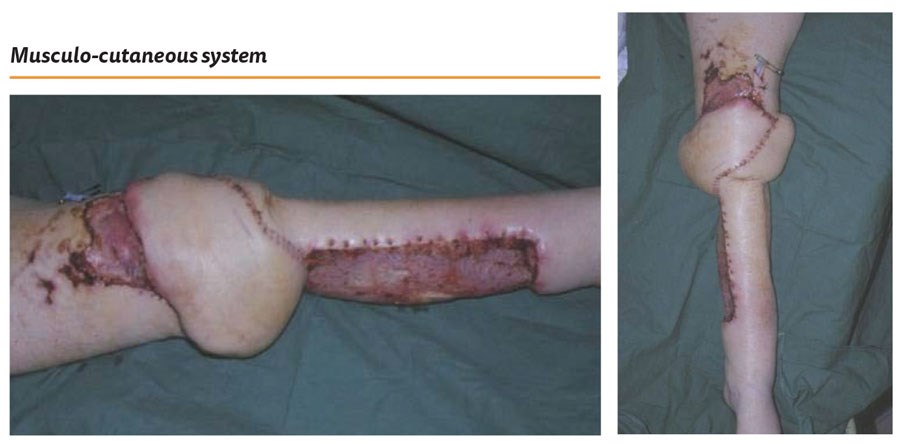
Figure 17: Medial gastrocnemius myocutaneous flap.
Discussion
Almost 30 years have elapsed since these two cases and in that time our understanding of the vascularity of the skin has evolved considerably. The understanding of the role of the fascia and the blood supply has given us the fascio-cutaneous flaps (Figure 18). In the 1990s, inspired by the work of my senior colleague Paul Townsend [1], I began to explore the perforators arising from the peroneal artery and developed an adipo-fascial flap which had a 5:1 length to breadth ratio (Figure 19) [2]. This was a true perforator flap with the dominant perforators clearly identified (Figure 20) but not followed through to the skin. This does raise more possibilities of developing refinements of the muscle flap. The perforators, which can be identified in the subfascial dissection, can be preserved and the overlying adipo-fascial extension can be added to the muscle to extend the scope of coverage.
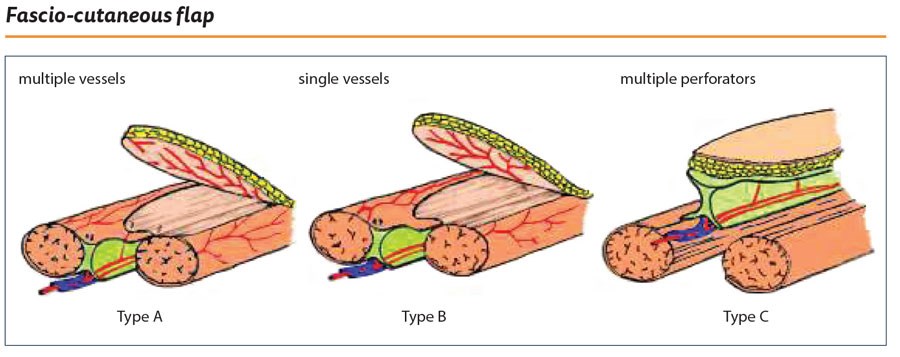
Figure 18.
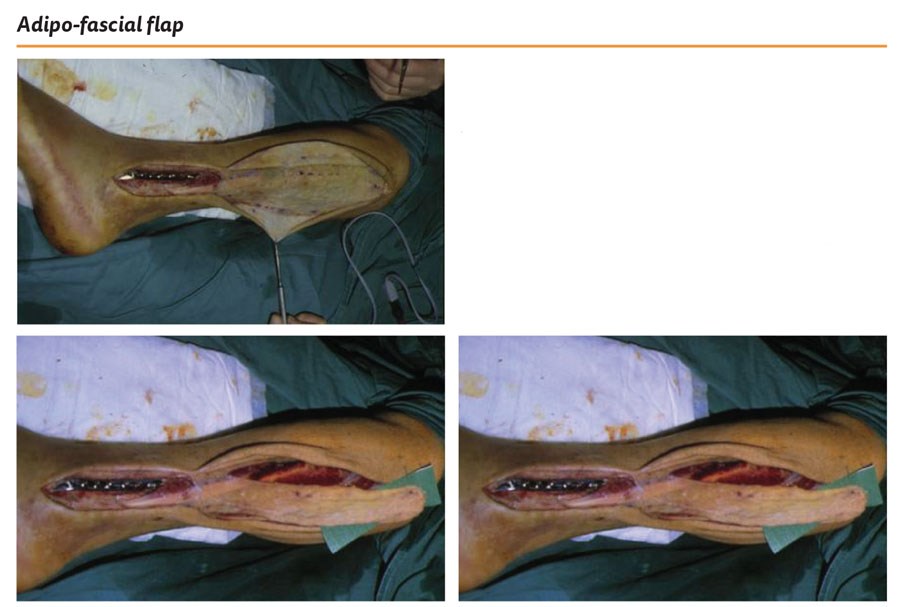
Figure 19: 5:1 length to breadth.
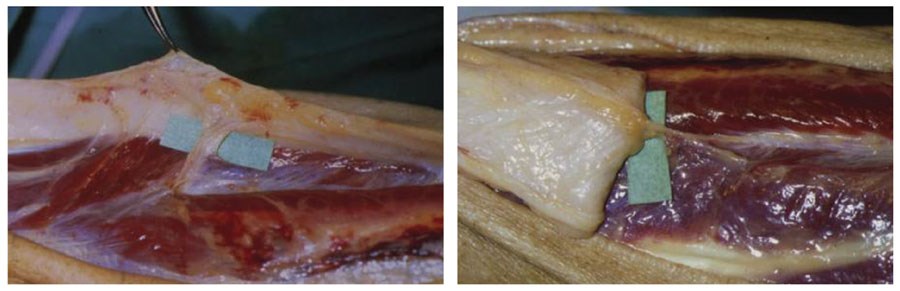
Figure 20: NB. I first described this in 1996 before perforator flaps became fashionable,
but the perforators from the peroneal artery are clearly visible.
This is all part of the beauty of plastic and reconstructive surgery. It is continually evolving and whilst we must learn the basics there are many refinements to explore to deliver the best outcome for each individual patient.
References
1. Lees V, Townsend PL. Use of a pedicled fascial flap based on septo-cutaneous perforators of the posterior tibial artery for repair of distal lower limb defects. British Journal of Plastic Surgery 1992;45(2):141-5.
2. Lee S, Estela CM, Burd A. The lateral distally based adipofascial flap of the lower limb. British Journal of Plastic Surgery 2001;54(4):303-9.
Declaration of competing interests: None declared.
COMMENTS ARE WELCOME