
Some eight years ago, I read about non-traumatic cannulas in the brochure of a French medical supplies company. I was fascinated by the elegance of these instruments, as they respect the integrity of the tissues by not cutting through them. It seemed so logical that, where with liposuction this is the standard, that with injectables a similar instrument should reduce risks of bleeding. So I ordered some 27G/40mm cannulas from them.
And when the cannulas finally arrived in my office, I was very eager to start using them on my patients and was already talking to them about how the chances of bruising would be considerably less. But when I did, I found myself struggling enormously and I felt quite clumsy with them. They seemed to have a will of their own and kept on ending up in places that I did not intend them to be. Even though I had made an opening with a needle, the skin seemed quite resistant to the cannula and did not allow the cannula to pass. The dermis seemed like a brick wall. My patients ended up bruised and traumatised after these first attempts. Logically, my ego got in the way, and I decided that cannulas had no place in my office, so I switched back to the good old and easy to control needles.
Of course, the cannulas kept on intriguing me so I invested some time into figuring them out. And as it turns out, you just need to know a few tricks and after a small learning curve, you will love them so much that you’ll want to marry them.
In my clinic in Amsterdam, I receive many international colleagues for hands-on training. During our ‘Liquid Facelift’ course, we focus on mastering of the cannulas in a treatment protocol that addresses many age-related anatomical changes, using minimum amounts of product placed strategically to give maximum results. Here, I would like to share a part of the contents this course.
Practical tips for controlling non-traumatic cannulas
- Disinfect! Cannulas are long and won’t become blunt after repetitive use on your patient. Especially when placing product superficially, the risk of infection increases, because the chances increase of the cannula touching a non-disinfected area. At high quality scientific congresses like F.A.C.E.2f@ce in Cannes, more and more attention is focused on complications and the term ‘biofilm’ is an often discussed subject. This is a low-grade infection that can remain asymptomatic for some time. Especially with high-volume treatments like the ‘Liquid Facelift’, we have to be very meticulous and use a surgical approach to disinfection. I advise disinfecting the entire face, including the hair around the ears and the temples, plus the skin of the neck. When using the cannula close to the hair, it is advisable to place sterile wet gauzes on the hair.
- No Touch technique! I usually use non-sterile gloves for my injectable treatments, and therefore I never touch the cannula with my glove. If you like to take the cannula between your fingers, I would advise making a sterile field on which the syringe, the cannula, the luer-lock connector, the sterile gauzes, and all the other necessities are placed sterilely. Then, using sterile gloves, it is safe to prepare your syringe, mix lido and touch the cannula with your gloves.
- Determine and mark the entrance places. Give a small amount (0.05-0.1ml) of lidocaine with adrenalin at these markings for haemostasis. Within a few minutes, you will see the blanching effect of the adrenalin on the skin. This will give you higher patient comfort, as the stab needle, as well as the passing of the cannula, will be painless, plus the chances of haematoma are reduced by the vasoconstriction.
- Lift the skin where you want to introduce the stab needle. By lifting the skin, you reduce the chance of accidentally puncturing a large blood vessel, as large vessels are generally in a deeper level.
- Use a stab needle that is at least the thickness of the cannula, or thicker. Thicker will allow for easier passing of the cannula.
- When you’ve inserted the stab needle, just insert the tip of the needle, so that you only pass the dermis and not deeper. The deeper you advance the needle, the higher the chance of creating a haematoma.
- Then, try to withstand the temptation of repetitive puncturing of the skin. The more you keep on stabbing the skin, the higher the chances of bruising.
- Leave the needle inside the skin for some time to allow any blood to coagulate. In the mean time, you can prepare your syringe for injection.
- If you use a needle that has exactly the same diameter as the cannula, you can make a scraping motion when you take out the needle. Scraping the dermis with the needle tip will make the opening slightly bigger and thus it will be easier to pass the dermis with the cannula.
- When you can’t find the opening that you’ve just made, squeeze the skin until you see a small drop of blood that marks your opening.
- For easy entrance of the cannula, spread the opening in the skin with thumb and index finger. That way it becomes easier to hit your target with the cannula.
- When you feel resistance while trying to pass the dermis, rotate the cannula by swiftly twisting the syringe between your thumb and index finger, like rolling a pencil between your fingers. Like the rotating drill of a drilling machine, it will become much easier for the cannula to pass resistances on its way.
- If you want to place the product at a deep level, lift up the tissue in front of the cannula to create a path of least resistance to the deep level.
- If you want to advance the cannula to the deep fat, or the supraperiosteal plane, you have to pass the superficial musculo-aponeurotic system (SMAS), which can be quite tough. In this case, use the rotation technique again to pass through the resistance of the SMAS.
- Keep in mind that if you use force, there is a chance of overshooting the SMAS and your cannula could potentially end up in places you don’t want it to. So protect important structures like the eyes by creating a physical barrier with a finger of your non-dominant hand, placed on the orbital rim or the infra orbital foramen, for example.
- If you want to place the product in a superficial layer, close to the dermis, then stretch the skin in the direction of the cannula by placing your thumb behind the entry hole and your index finger in front of it.
- If you push down the syringe, the flexibility of the cannula will direct the tip upward. This way, you can keep the cannula at the dermal-subdermal junction. Cannulas of 27G and thinner can behave like needles because they are so thin. These cannulas can be manoeuvred intradermally with some effort and discomfort of the patient. Real intradermal injection is not recommended while using cannulas.
- Whenever you feel any resistance at the superficial level, for example, while passing the septae between the superficial fat compartments, use the rotation technique to pass any resistances.
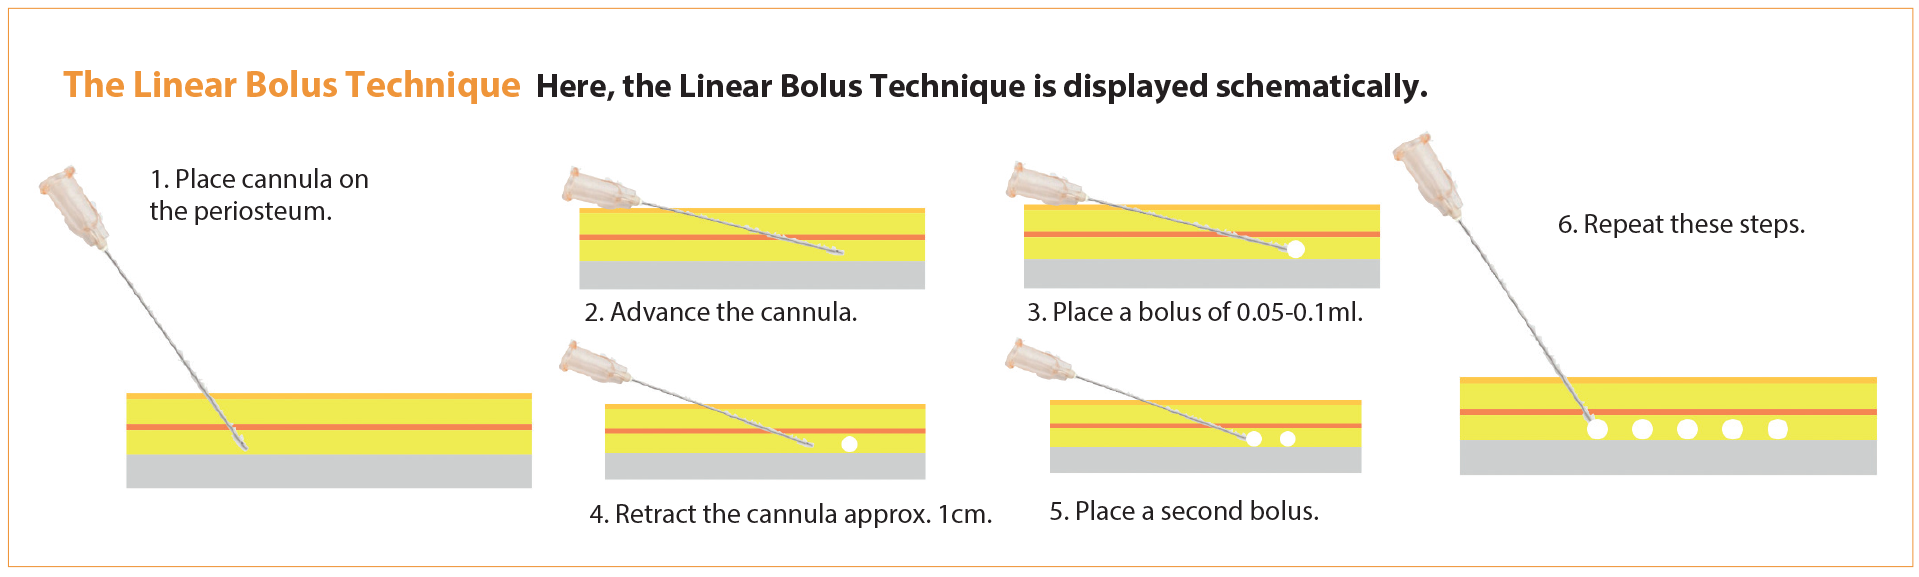
- For the optimum use of the limited product that we have available to our patients, the Linear Bolus Technique can be used. This technique is meant for deep deposition of product for lifting of the soft tissues. Placing boluses on the periostium of the zygoma in a ‘Liquid Facelift’ will lift the cheeks back to their original position. If you would like to place your limited volume in linear threads, you will have much less lifting power than if you place the product in concentrated boluses.
Declaration of competing interests: None declared.
COMMENTS ARE WELCOME