Corrective facial surgeries are highly elective procedures. Outcomes depend largely on the nature of the surgery performed (requiring an in-depth knowledge of surgical techniques and anticipated soft tissue changes) and should be predictable in terms of risk and outcomes, in line with patient expectations. Digital image processing (i.e. raster graphics editing) enables rapid, high-quality photographic simulations that transform a surgeon’s view into tangible images, providing patients with visual frames of reference.
Thus, every orthofacial specialist should be familiar with this extraordinary tool. A brief overview of various techniques embedded in commercially available software is provided for ready implementation. Workable software, adequate clinical photo-imaging, and precise knowledge of what is surgically feasible are the only pre-requisites.
Introduction
Simulations of orthofacial surgical outcomes, based on actual photographs, are the ultimate in decision-making tools. Some surgeons prefer to base procedural discussions on profile drawings (Figure 1), affording them greater freedom in interpreting outcomes. However, we have found that quality simulations are optimal as a means of validating what patients expect. For example, a patient interested in a profile change may request a rhinoplasty, unaware that other procedures could offer equivalent or better results. Such discussions rely on photo simulations to approximate outcomes in the most realistic way.
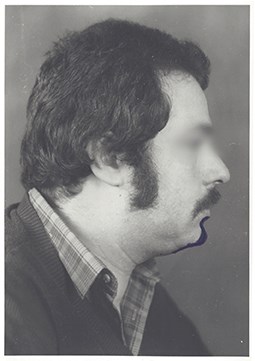
Figure 1. Old photo simulation using a profile line drawing on a printed photo.
At present, digital photographic manipulations are achieved through raster graphics editors, the best known of which are Adobe Photoshop® and GIMP®. Excessive use of these editors (i.e., ‘photoshopping’) in general marketing unfortunately has imparted a negative connotation through unrealistic portrayals in the fashion world and in commercial advertising. Nevertheless, such tools are highly appropriate in medical realms where photo simulations give the patient a far greater understanding of potential outcomes of various interventions under discussion. In forensic medicine, the natural ageing process of missing persons may be simulated, using existing photos. Likewise, anticipated outcomes of surgeries may be predicted, especially in corrective facial and cosmetic procedures. On the other hand, it is mandatory that photo simulations depict only what is genuinely feasible, avoiding any artistry that is surgically impossible.
Goals of photo simulations in orthofacial surgery
In corrective facial surgery, the primary goal is predicting results of procedural options as accurately as possible, using standard photographs of patients themselves. Consequently, all depictions should be of superior quality to avoid any confusion posed by photographic flaws. Finally, image revisions should be achievable in a reasonable time frame. In the best-case scenario, simulations should be achievable during the consultation.
Clinical image-taking
A digital image of high quality is fundamental in predicting surgical results. Uniform background colour and balanced lighting are thus recommended, and the process is facilitated by frontal views, taken as straight as possible. Each digital file incorporates information on canvas size, which is the actual size of the printed image, and image resolution, which is number of pixels per surface unit. For a computer monitor or an A4-print, image resolution of 300 dpi is more than sufficient.
When the surgeon relies on patient-generated images (i.e. ‘selfies’), errors in centricity typically are seen. Such frontal photographs usually are taken from a slightly oblique or lateral stance, far above the facial midpoint. Less pixelated portraits cut from group photos are also problematic, and in shots that maximise expansion, focal length (or zoom) is nominal, creating a fisheye effect. More forward-projecting parts of the face (such as the nose) are then easily oversized and tend to distort simulations.
Other publications addressing clinical photography in greater detail may be consulted for further information on this topic [1,2].
Software requirements
Currently, a variety of software solutions are commercially available for digital image processing. Adobe® Photoshop® (PS), encompassing a group of applications for Windows and OS X® platforms, has become synonymous with photo manipulation, just as Kodak® and analogue photography were aligned in the past. Earlier releases of PS included two versions: Elements® (PSE), a light and less costly version; and Creative Suite® (CS), a higher-priced product for professional users. Recently, the CS version was abandoned in favour of a cloud-based application (PS CC®) with a monthly subscription fee.
GIMP® is open-source software that is compatible with all three major operating systems. Although other editors exist, we have not tested them; and because the latest version of PSE lacks some important tools, only PS CS and GIMP® are recommended for facial photo manipulations. The chief advantage of GIMP® is that it is available at no cost. Because PS programs have dominated the market for a long time, they are widely referenced, which is a distinct advantage for PS neophytes. Illustrations in this manuscript reference the CS version, but essentially all operations can also be performed with GIMP®.
It is beyond the scope of this article (and unnecessary in this context) to highlight all functions of a digital image processing program such as PS. The interested reader is referred to other texts delineating various tools of the program (over 1000 for PS CS). For the sake of simplicity, suffice it to say that many (if not most) of the tools control colour and light settings. These options may be important for photo professionals, but they are of little benefit if an acceptable set of studio photographs are in hand. It is far more important to understand the various selection and transforming tools. Moreover, particular attention should be paid to a function often ignored by the uninitiated, which is that most digital imaging manipulations are executed on separate layers. In the logistics of raster graphics editors, more or less transparent layers overlie an original image. This concept is particularly intriguing in medical photo-simulations, because sequential views may be toggled with a single mouse click.
Technical notes
Exercise 1: Eliminating blemishes and rhytids (simulated laser and botulinum therapies)
An easy and straightforward tool of PS is the healing brush. This tool is based on an algorithm that automatically replaces selected content of an image with the average pixel value of surrounding structures. Any selected blemish or brushed-over rhytid (always in the plane of skin tension lines) is eliminated completely. Such unrealistic and unachievable overcorrection then may be rescued through the layer function. By eliminating the flaws in a separate layer, sufficient opacity is added to create a more realistic corrective outcome. This function can further be used to refine more complex manipulations, yet to be described.
Exercise 2: Simple transformation of facial profile outlines (simulated nose and chin procedures)
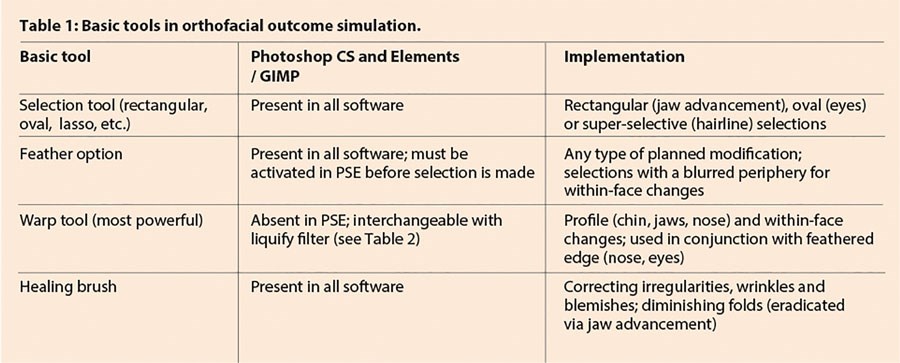
In this section, both the warp tool and the comparable liquify filter are introduced. These options serve as virtual scalpels, may be used interchangeably (as a matter of personal preference), and are extremely valuable in photo-simulation tasks. Unfortunately, the warp tool is gone in the latest version of PSE. In Figures 2-4, a simulated correction of nasal contour is illustrated, using the liquify filter of the main menu toolbar. Filters enable an array of corrective effects, most of which have more graphic or artistic value. However, the liquify filter is actually more of a transformation tool, allowing the content of a layer to be manipulated at various brush sizes in a separate window. An alternative approach is to use selection and transform tools in sequence. The transform tool may be accessed through the edit menu or via shortcut. This tool is familiar to any regular user of MS Word® or MS PowerPoint®, where size adjustments and rotations are performed in similar ways. In digital image processing programs, selected areas may also be skewed, distorted or scaled. All of these functions impact simulated facial surgeries very little, but the selected areas may also be warped (right mouse click and select warp). The warp tool adds intersection lines to rectangular selections. Every intersection point may then be individually transformed. The major advantage here (as opposed to a liquify filter) is that the changes made are somewhat more easily traced at the time of surgery.
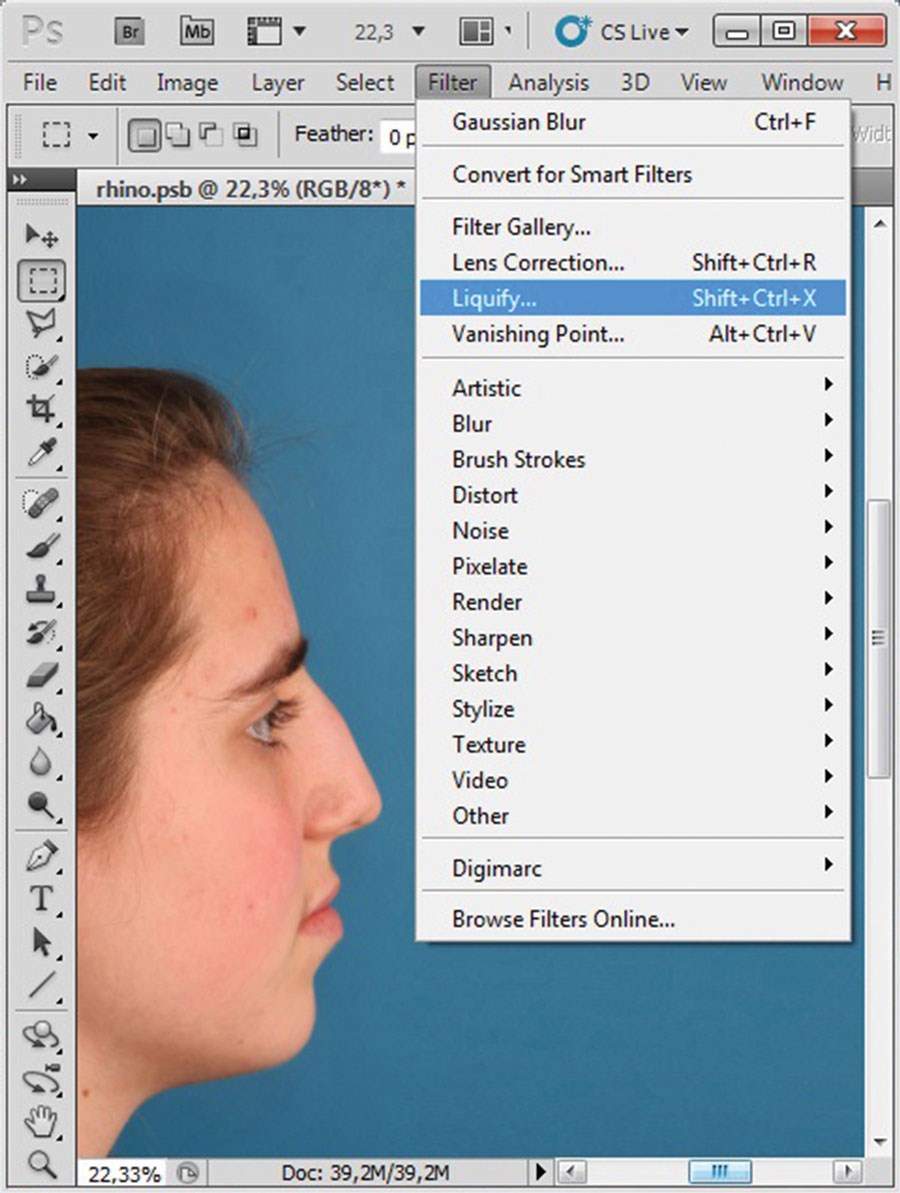
Figure 2 (above left): Original image of patient requesting nasal hump reduction.
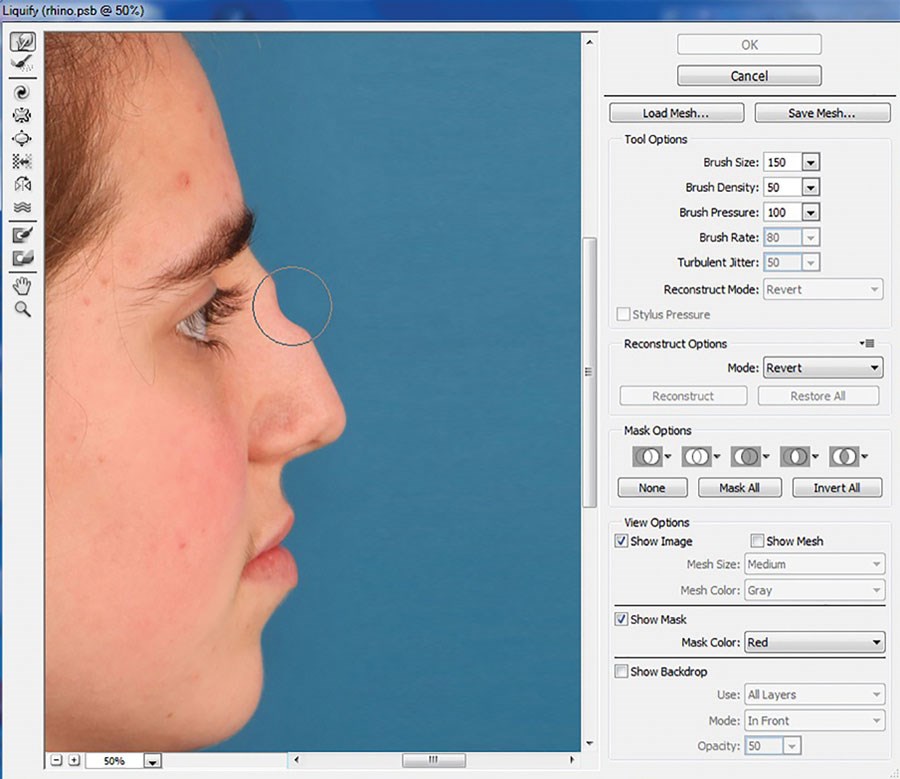
Figure 3 (above middle): In choosing liquify filter, new window opens.
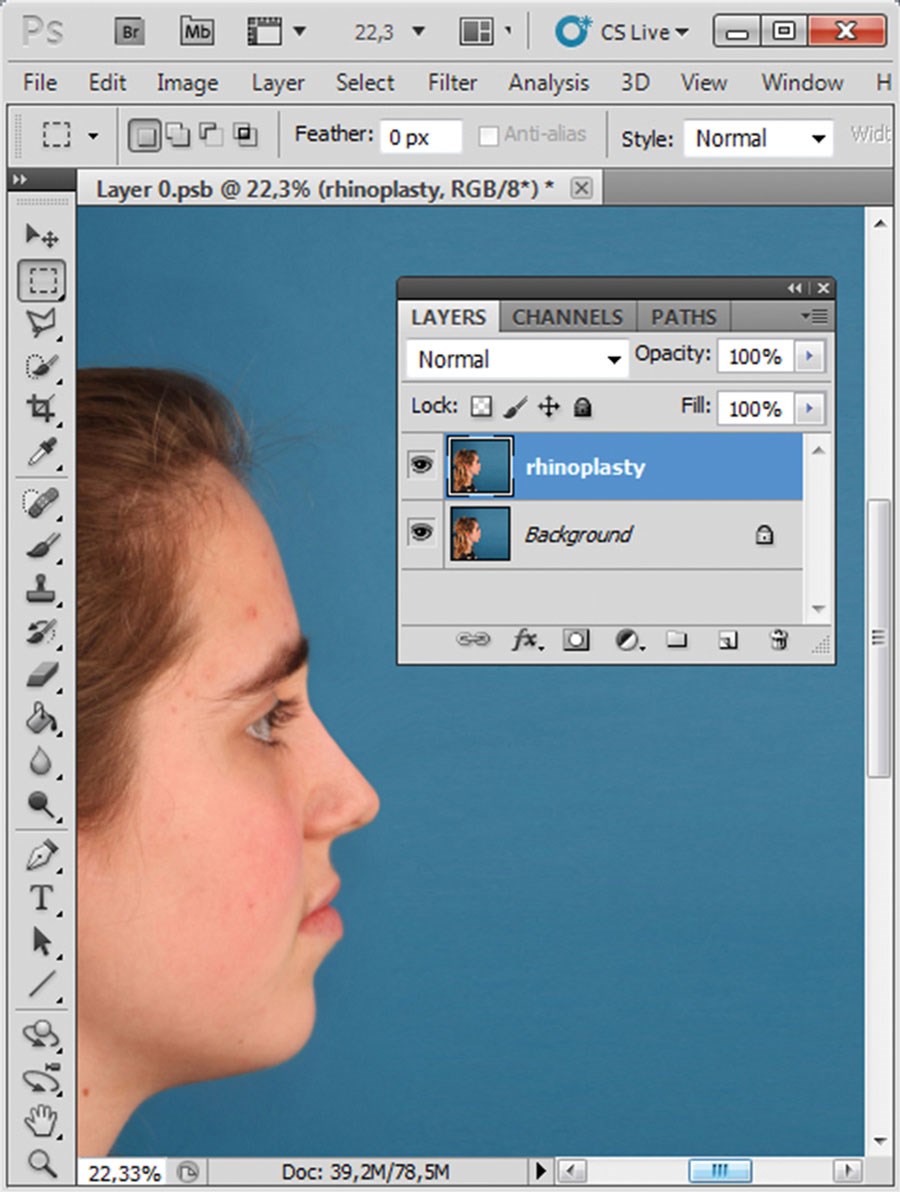
Figure 4 (above right): New profile line after simulated hump reduction.
Exercise 3: Advanced transformations
To this point, a uniform background has simplified selection and transformation during simulated changes in facial contours. However, more in-depth knowledge of the selection tool is needed for alterations within facial confines, as in frontal views. To simulate lateral nasal osteotomy with nasal tip refinement, a liquify filter clearly cannot be used without creating collateral changes, in the eyes particularly. Instead, the polygonal lasso tool may be used to outline the nose (with adjacent tissue as allowed) for transformation, leaving the eyes unaltered. Before the selected area is copied to a new layer, it is advisable to blur the periphery, thus preventing the impression of a separately constructed image. Under the selection function of the main toolbar is a menu of options for refining a selection in PS, including the feather option (hidden under modify selection). A choice of how many pixels to feather must be made. At a resolution of 300 dpi, a 10-pixel feathered edge is adequate. In Figure 5, where the selected area is copied to a new layer, the effect is easily seen against a transparent background. Further transformations (Figure 6) are then done by warp tool or liquify filter, as already discussed.
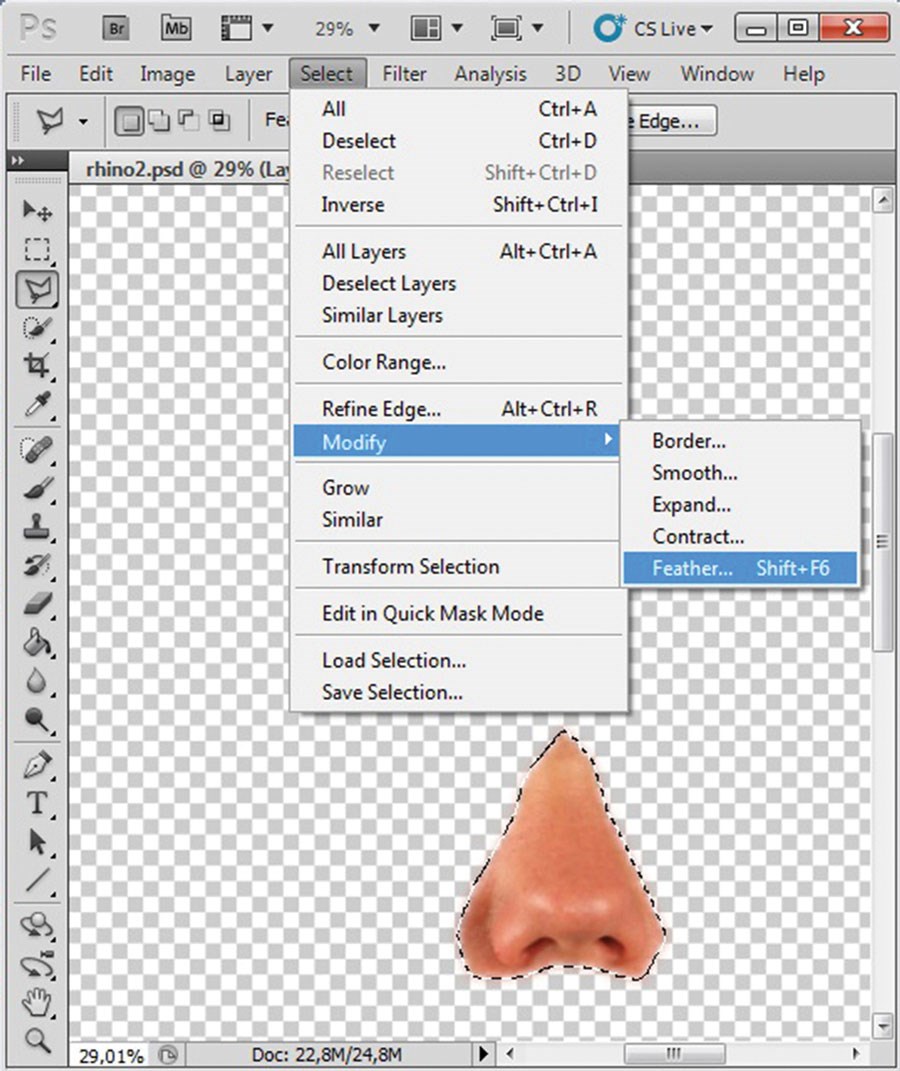
Figure 5 (above left): Feathered copy embedded in new layer.
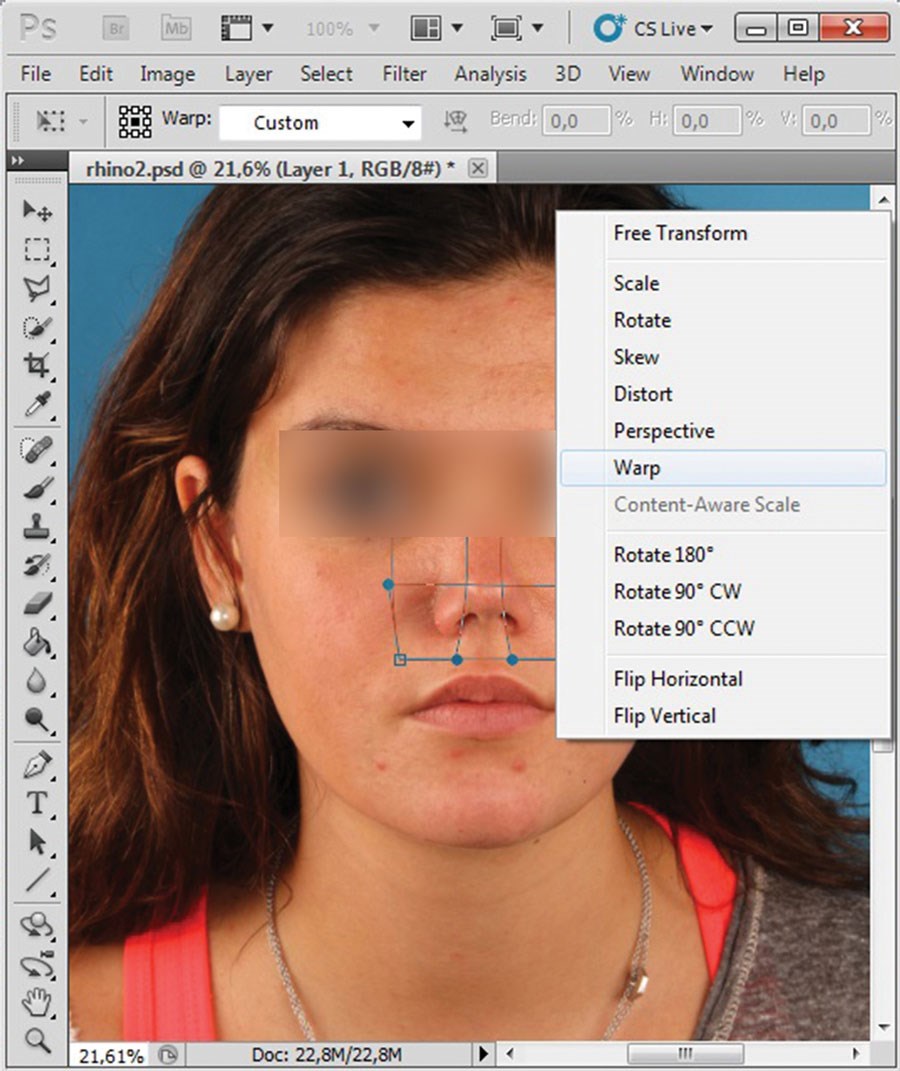
Figure 6 (above right): Lateral osteotomy and tip refinement simulated
by warp transformation of overlay (background layer intact).
Most simulated facial procedures may be carried out this way, including lowering of the hairline (Figures 7-8), jaw-angle corrections and malar bone augmentation (Figure 9), and lateral canthopexy.
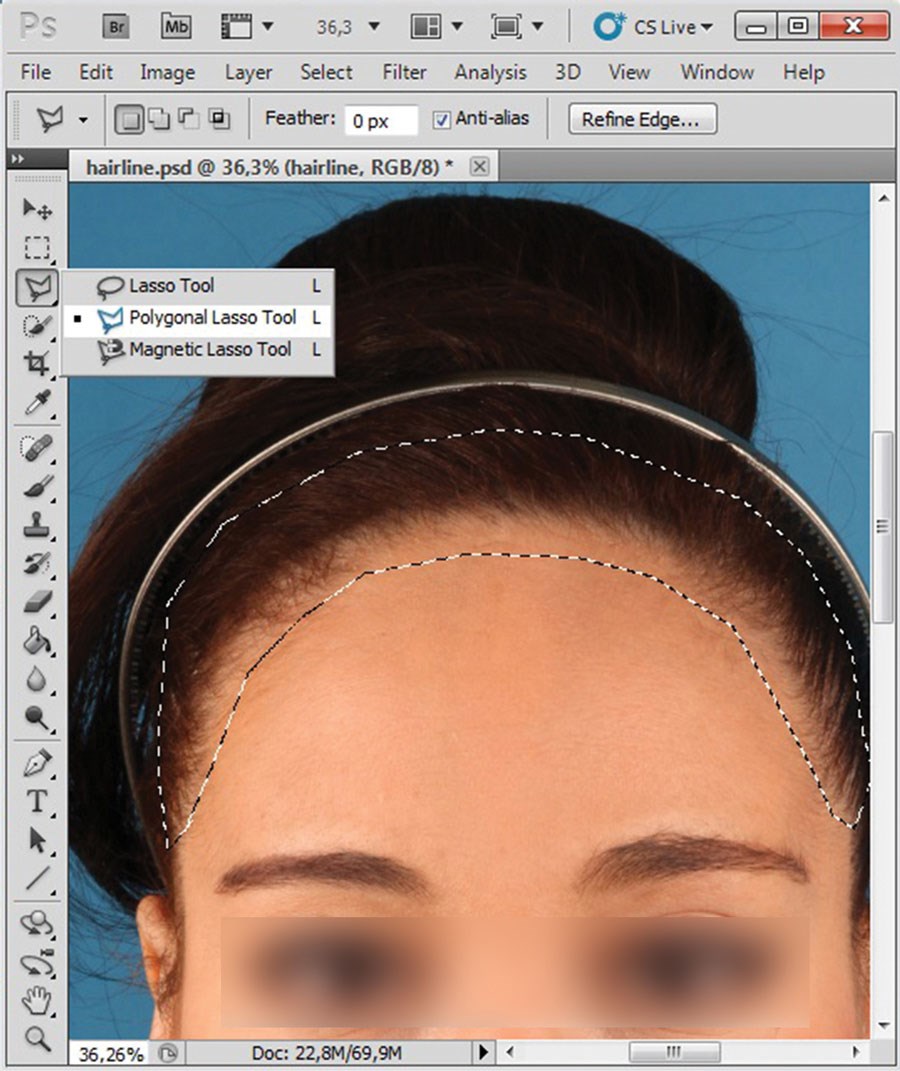
Figure 7 (above left): Simulated lowering of hair line, using the polygonal lasso tool to select hairline.
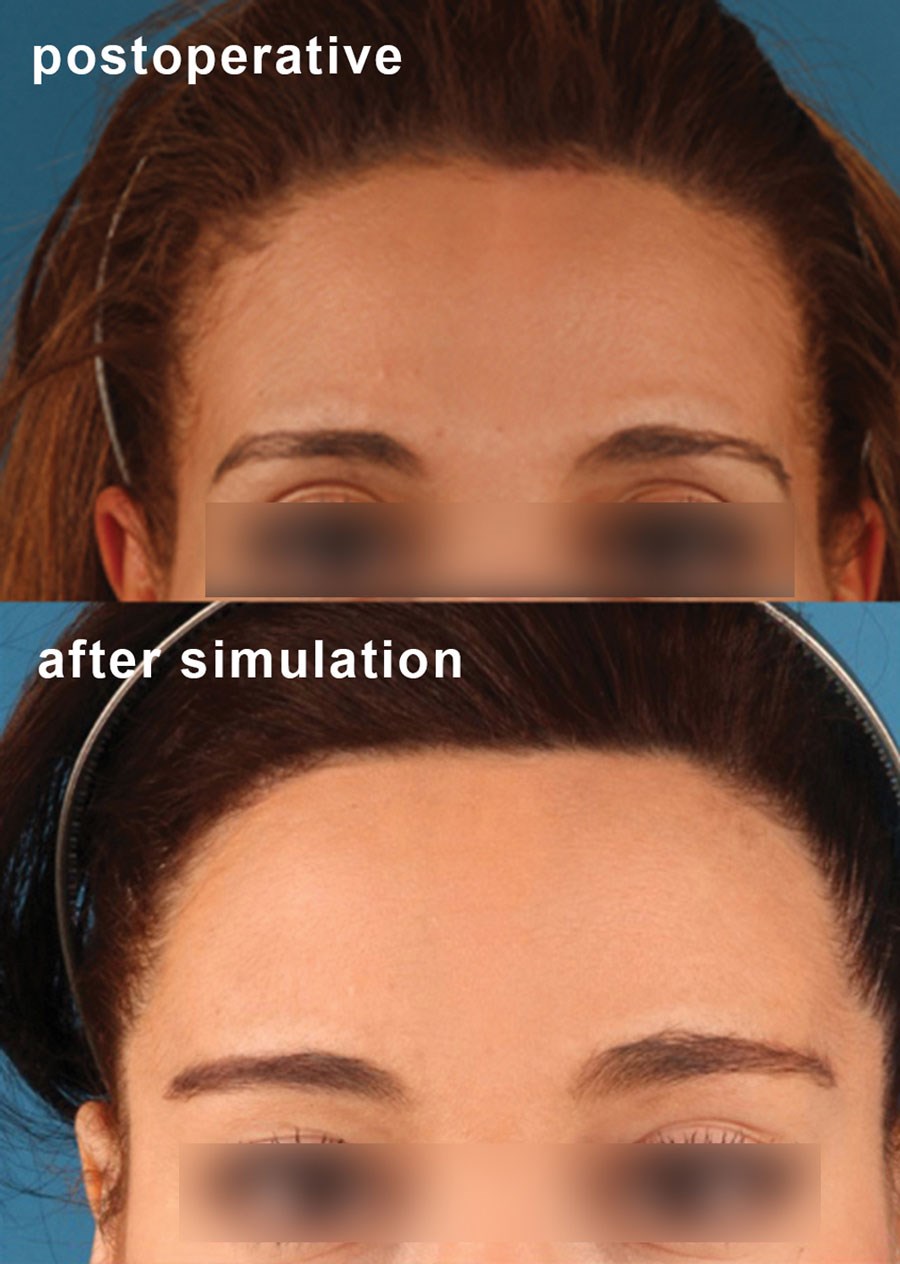
Figure 8 (above middle): Liquify filter (alternatively warp transformation) helped lowering
the hair line in this instance. Compare the actual postoperative result to the simulation.
Figure 9 (above right): Highlighted areas individually selected, copied to
new layer (with feathering), and modified via warp transformation.
Exercise 4: Predicting profile changes after osteotomies of the jaws
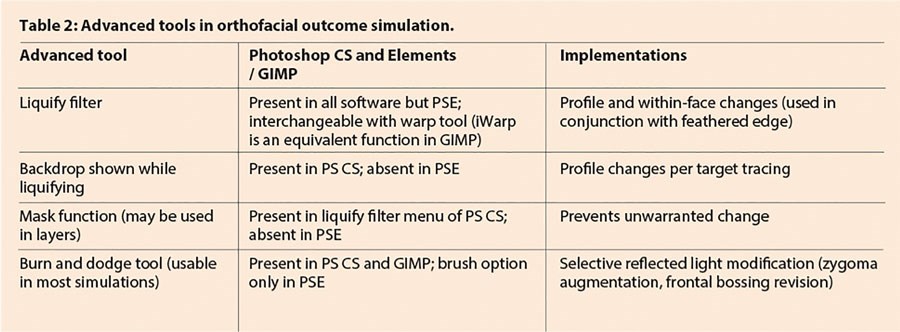
In the preceding examples, surgical effects have largely involved soft tissue alterations (above rhino-osteotomy being the exception). For bony interventions, contour revisions depend on the extent to which soft tissues mirror skeletal changes. These relationships are discussed elsewhere [3]. Modern cephalometric planning software, such as Facewizz (www.facewizz.com), incorporate data accrued in the literature and may aid in automating soft tissue landmark prediction, providing files importable into PS as layers. Analogue tracings too may be scanned and opened as separate layers in digital image processing software, serving as backgrounds when the liquefy filter of PS is used. For this, advanced mode is applied in the liquify window. By activating the show backdrop option, a predictive tracing (adjustable in opacity) will overlay the base image (Figures 10-12). The rest of the simulation then follows aforementioned protocol.
Figure 10: Baseline image of genioplasty simulation.
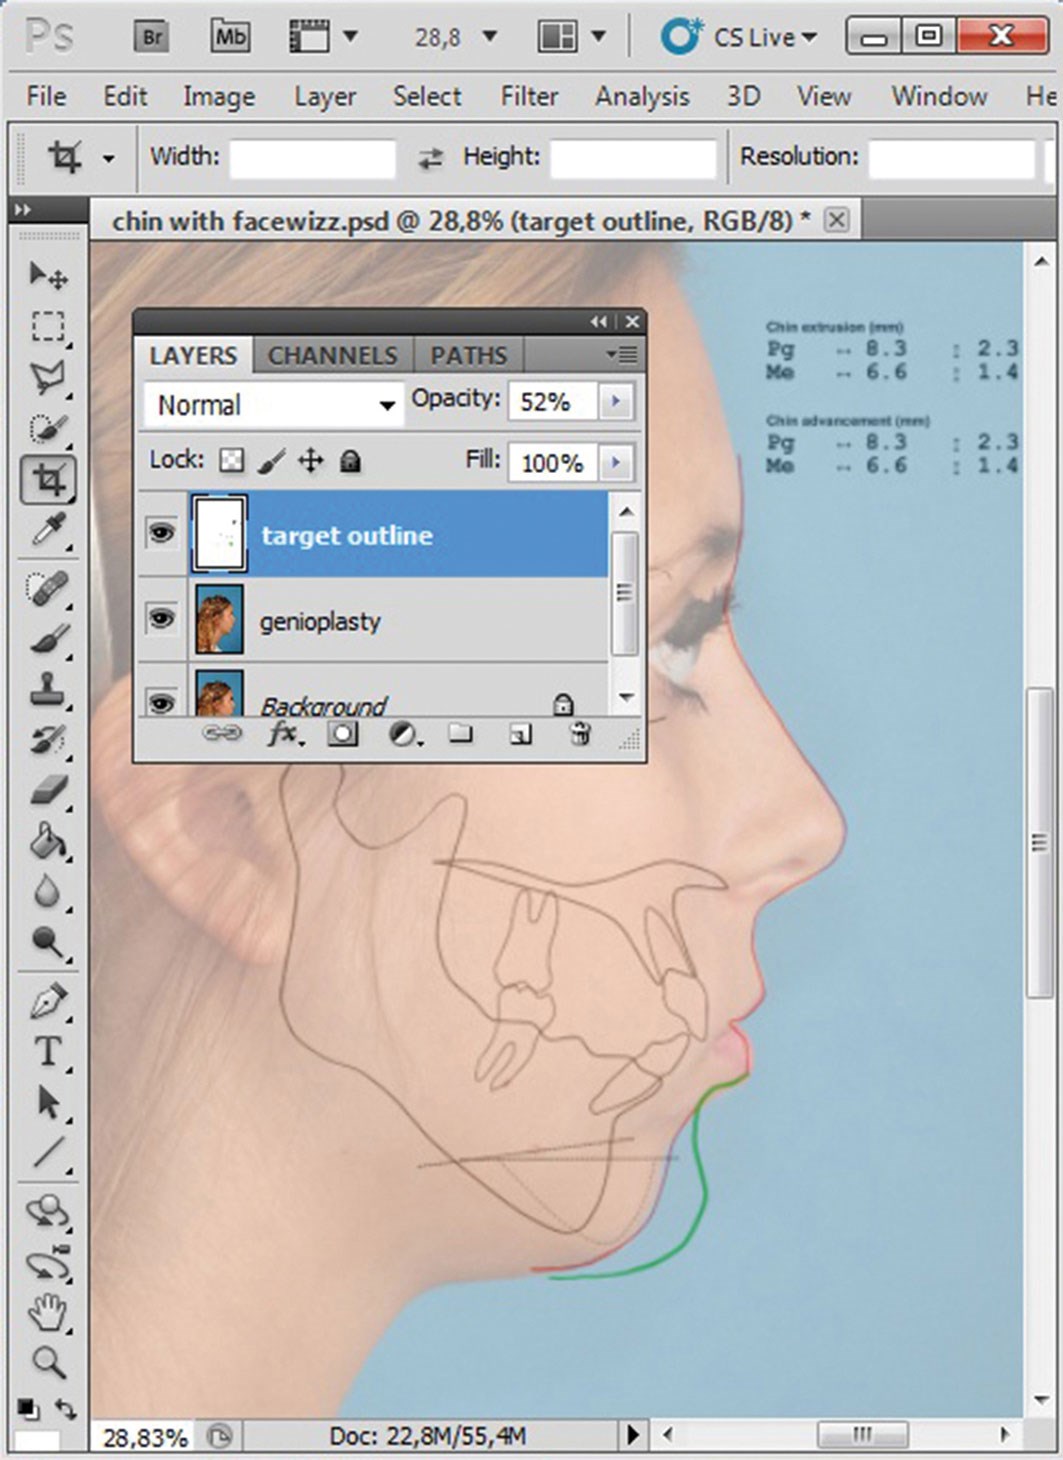
Figure 11: Predictive tracing overlay as partially transparent new layer.
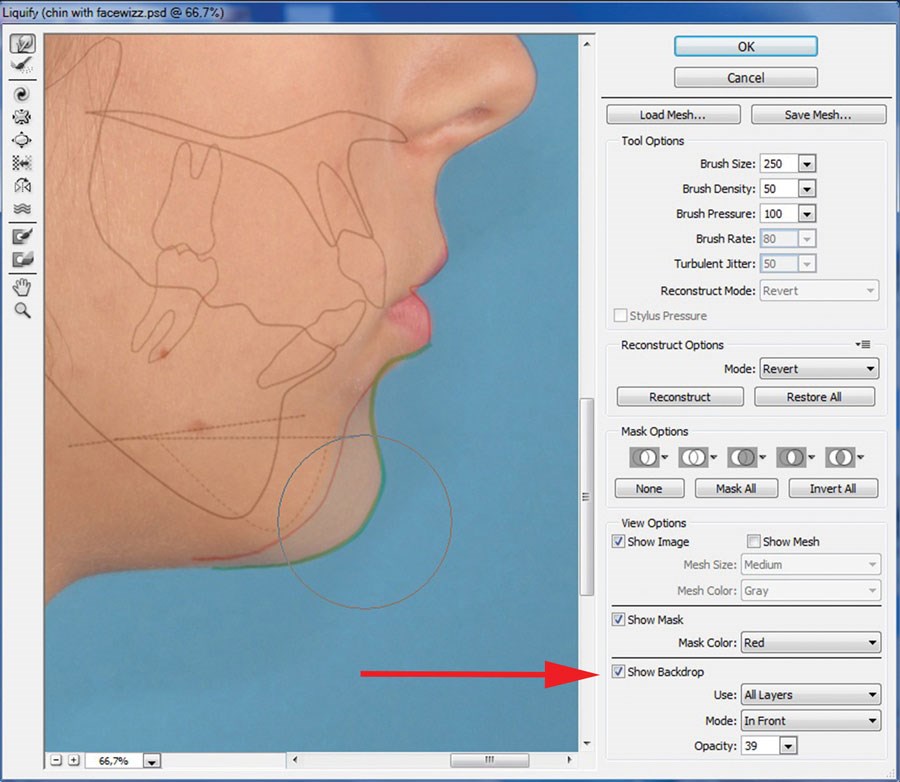
Figure 12: Advanced mode of liquify filter activated; transparency
possible in other layers with liquify filter (red arrow).
Exercise 5: Working with masks
The liquify filter is a powerful tool, but experienced surgeons must be careful that parts of the face unaffected by surgery are not distorted. A mask is a refinement of the layer logic behind PS and similar programs, and may be applied to modify only what is within or beneath the area selected (i.e. a fixation mask). Usually, masks have feathered margins, but this is adjustable as needed. When working with the liquify filter, a colourised (red) mask may be applied. All parts of the face that will not be modified are selected with a feathered mask. Masks are alternative means of within-face transformations.
Discussion
The technical aspects of raster graphics editing, as used in predicting orthofacial surgical outcomes, are highlighted herein. Simple tasks, such as injection of rhytids, as well as a gamut of procedures involved in complex facial makeovers are amenable to simulation. These techniques were inspired by those of photo-retouching experts. The interested reader is referred to a list of related texts [4] for further edification, with the caveat that artistic license must be guarded in this context. Recently, Pfeufer coined the German phrase ‘Gefälligkeits-Simulationen’, referring to a simulation driven more by desire to please the patient than by realistic expectations [5]. One such example would be an overly reduced cervico-mental angle in a simulated advancement of the mandible or chin. Clearly, this is the wrong strategy for experienced surgeons.
On the other hand, just how accurate are the predictions that are made? There is no clinical data to support every simulated change. For some soft tissue landmarks, outcomes are easily gauged (e.g. after orthognathic interventions), including newly projected A, B, Me, and Pg points. For other points, and especially for lines connecting these points, supportive data is incomplete or is conflicting, as shown in a recent systematic review on hard-to-soft tissue ratios after maxillary surgery [3] and by a similar analysis directed at other facial cosmetic surgeries [6]. Ultimately, not all soft tissue landmarks may be predicted with scientific accuracy, due to lapses in data on gender, age, skin thickness, and ethnicity or differing surgical strategies and general or personal technical limitations. Therefore, predictions of many (if not all) procedures reflect the competence of surgeons and remain their responsibility. However, one should refrain from simulating that which resides outside the realm of ad hoc surgical possibilities.
A case can also be made against commercially available 3D simulations. Although fully automated 3D simulations undoubtedly will abound in the remote future, there is still a considerable amount of unsponsored scientific work to be done on soft tissue landmark changes in 2D profile, frontal or oblique views, using vectors rather than single points. The pursuit of all 3D profile changes promises to be even lengthier.
From a legal perspective, some surgeons maintain that simulations may be grounds for future claims, if actual and predicted outcomes differ. It has also been argued that simulations should not appear too life-like to avoid miscommunicating such realism. In our experience, the opposite is true. Patient dissatisfaction generally stems from diminished expectancy when high-quality simulation is bypassed. Hence, photo simulations generated in our clinic are attached to patient files and saved for later evaluations.
Last but not least, photo-simulations have become useful teaching tools. In such delicate and elective surgeries, the learning curves of fellows are difficult to define. Simulations encourage a trial-and-error atmosphere where virtual procedures may be discussed in groups. We consider this a major contribution to our teaching centre activities.
Conclusion
PS and similar programs enable simulated outcomes of most orthofacial interventions. This overview of four basic functions allows immediate use by readers (Table 1). More sophisticated functions are also described in part (Table 2).
References
1. Ettorre G, Weber M, Schaaf H, et al. Standards for digital photography in cranio-maxillo-facial surgery - Part I: Basic views and guidelines. J Craniomaxillofac Surg 2006;34(2):65-73.
2. Schaaf H, Streckbein P, Ettorre G, et al. Standards for digital photography in cranio-maxillo-facial surgery - part II: additional picture sets and avoiding common mistakes. J Craniomaxillofac Surg 2006;34(7):444-55.
3. San Miguel Moragas J, Van Cauteren W, Mommaerts, MY. A systematic review on soft-to-hard tissue ratios in orthognathic surgery part I: Maxillary repositioning osteotomy. J Craniomaxillofac Surg 2014;42(7):1341-51.
4. Kelby S. Professional Portrait Retouching Techniques for Photographers Using Photoshop. USA; New Riders; 2011.
5. Pfeufer W. Unglücklich – trotz gelungener Nasenkorrektur. J Ästh Chir 2014;7(3):120-5.
6. Tasman AJ. Rhinoplasty – indications and techniques. GMS Curr Top Otorhinolaryngol Head Neck Surg 2007;6:1-23.
Declaration of competing interests: Prof Mommaerts is the developer of the Facewizz software discussed in this article.
TAKE HOME MESSAGE
-
In corrective facial surgery, the primary goal is predicting results of procedural options as accurately as possible, using standard photographs of patients themselves.
-
Simulations of orthofacial surgical outcomes, based on actual photographs, are the ultimate in decision-making tools.
-
In teaching centres simulations encourage a trial-and-error atmosphere where virtual procedures may be discussed in groups.
-
A brief overview of various techniques embedded in commercially available software is provided herein for ready implementation.
-
Workable software, adequate clinical photo-imaging, and precise knowledge of what is surgically feasible are the few prerequisites.
COMMENTS ARE WELCOME