
Summary and introduction
A mastopexy is a breast uplift surgical procedure. It derives from the Greek for breast (mastos, meaning breast) and uplift (from the Greek pexis, meaning fixation). When we perform a mastopexy, we can perform the procedure on its own, included as part of a breast reduction or included as part of an augmentation procedure (when it is referred to as an augmentation mastopexy). In this article I shall explain the different methods of performing a mastopexy, the indications, cautions and concerns, as well as the attendant risks, complications and implications of the procedure.
The aesthetic ideal of a breast
Before we consider why a mastopexy would be indicated on anyone, we need to consider the ideal shape of a breast. Mallucci suggested that the ideal breast has a nipple that sits in line with, or slightly above, the inframammary crease, with the breast centred approximately around the nipple [1]. When the breast shape starts to drift away from the aesthetic ideal, we start to see indications for breast reshaping surgery (augmentation, mastopexy, reduction, augmentation mastopexy), to either restore or deliver a breast which is closer to the ideal shape and proportions that the patient is seeking. We also need to understand that breast is a gland, which produces milk. The gland of the breast sits around the nipple, and the breast is usually centred around the nipple, with approximately half the breast above the nipple, half below, half medially and half laterally. This is the normal, aesthetically ideal breast.
Nipple and glandular ptosis
Ptosis means drooping or sagging and we sometimes see this in the breast in one of two areas – we can see nipple ptosis and we can see glandular ptosis. When the nipple sits lower than the most prominent part of the mound of the breast, this is called nipple ptosis. When the mound of the breast sits at a low level this is called glandular ptosis. In glandular ptosis, we also see a concavity in the upper pole of the breast, and a low ‘take-off’ of the breast mound. Glandular ptosis also means there is a reduction in the pinch thickness of the upper pole of the
breast [2].
The indication for a mastopexy is when the nipple sits lower than we would consider ideal, and we refer to this as nipple ptosis. There are a few measurements that we can perform to determine if the breast is sitting too low. We can measure the distance from the sternal notch to the nipple; if this distance is greater than approximately 21cm then we may think of the nipple as sitting too low. Alternatively, we can measure the difference in height between the nipple and the inframammary crease; the lower the nipple sits from the inframammary fold, the greater the degree of nipple ptosis. Lastly, the nipple usually sits around half way down the length of the arm. Inevitably when there is ptosis of the nipple, there is also ptosis of the gland of the breast.
If the breast is too large, with nipple and glandular ptosis, this is an indication for a breast reduction with concomitant mastopexy. If the breast size is proportionate, a mastopexy is indicated for nipple and glandular ptosis. If the breast is too small, an augmentation mastopexy is indicated. Some surgeons will perform an augmentation mastopexy as two separate staged procedures, rather than as a single surgical procedure in view of the higher complication rate of an augmentation mastopexy, compared to an augmentation alone, or a mastopexy alone. When we perform a breast augmentation we tend to stretch out the tissues, and when we perform a mastopexy we tend to tighten the tissues. When we perform an augmentation mastopexy, we are not only stretching the tissues, but we are tightening the tissues at the same time. This has a multiplicative effect on the complication rate compared to an augmentation alone, or a mastopexy alone [3].
How I do a mastopexy (and augmentation mastopexy, and breast reduction)
The first thing I do when I perform a mastopexy is to mark the patient. I ask the patient to sit up on the edge of their surgical trolley or hospital bed. I ensure their shoulders are level and I ask them to sit up with their back as straight as possible. I mark the sternal notch and the midline and I mark the axis of the breast. Traditionally, this is marked by placing a tailor’s measuring tape over the shoulders of the patient with the tape directed to the nipple. It can also be marked by following a line from approximately the midline of the clavicle down to the nipples. I mark the new ideal position of the upper part of the areola, as a short horizontal line along the breast axis. This completes the markings that I place while the patient is sitting up. I next ask the patient to lie down and continue my markings. I stretch the areola and mark the width of the areola that I would like to have at the end of the procedure.
I usually manage to draw a circle by marking dots at 3 o’clock, 6 o’clock, 9 o’clock and 12 o’clock. I draw further dots in between these markings and mark the circular edge of the new areolar. I then mark the new circumference of the areolar with a slight peak at the upper part of this, which traverses around the current position of the areolar. Finally I mark the lower part of the breast skin in what is known as a ‘mosque dome’ pattern. In those cases where there is likely to be a significant amount of skin excised, I extend the excision markings laterally, but very rarely medially. I sometimes mark the upper part of the breast where I would like to see the breast gland elevated, or if I am performing an augmentation mastopexy, I mark the upper part of the pocket that I intend to make.
Once the markings have been made, the patient is ready for surgery. The first step I perform is to place a breast tourniquet around the base of the breast. This stretches the breast skin and allows for the marked skin to be de-epithelialised while maintaining the skin of the areolar. The nipple / areolar complex (NAC) is then raised on a vascular pedicle. My preference for the vascularity is to have it superiorly based if the most inferior part of the ‘mosque dome’ sits superior to the superior-most marking of the areolar. If the superior most part of the areolar marking sits inferior to the inferior most part of the ‘mosque dome’ then my preference is to raise the NAC on a medially supplied vascular pedicle [4]. I make the thickness of the NAC flap approximately 1cm if I am using a superiorly based flap but thicker if I am using a medially based flap. When I am performing a large breast reduction, I will often use a medially based flap, especially since the ptosis in large breast reductions is usually much more significant than when performing augmentation mastopexies.
The next step is to dissect the breast tissue. With the NAC vascularity confirmed and protected, breast reshaping or breast reduction can be performed with confidence that resection or reshaping will not have a negative impact on the NAC vascularity. In the case of a mastopexy and augmentation mastopexy, I make a vertical incision through the breast gland, in the line with the axis of the breast, in the lower pole of the breast down to the pectoralis fascia. This allows me to elevate the breast off the pectoralis fascia in a wide pocket. If I am placing an implant, the pocket is used for the implant, and if I am only performing a mastopexy, the pocket is required to reshape the breast tissue by elevating inferiorly and laterally placed breast tissue more cranially and more medially.
Once the dissection is performed, I medialise the laterally positioned breast tissue. Even though the pocket is made smaller at this point, for an augmentation mastopexy, the size of the pocket is not reduced to the extent that the implant cannot be placed. In fact, I place the implant in before medialising and elevating the infero-laterally based excess breast tissue. If I am performing a breast reduction, I am able to excise the inferior, medial and lateral breast, maintaining the upper pole of the breast, to maintain cleavage.
At this point, the breast is ready to be sutured. I usually use a combination of 2.0 and 3.0 vicryl for closure. I tend not to use drains.
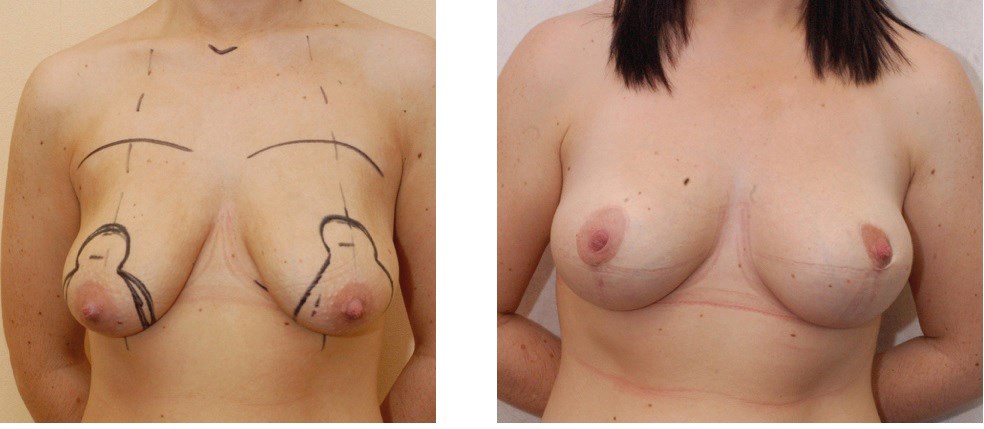
Figure 1.
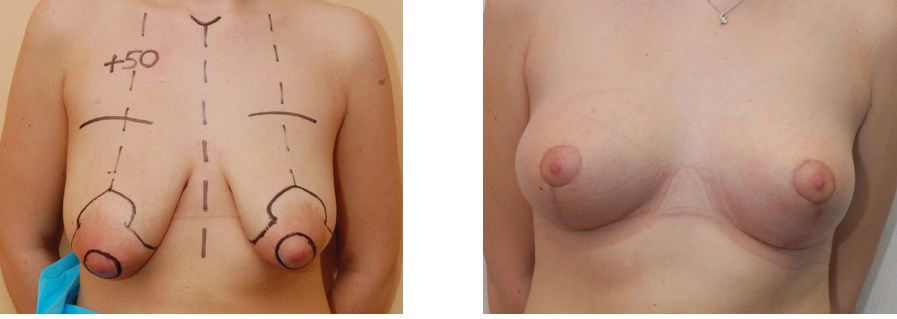
Figure 2.
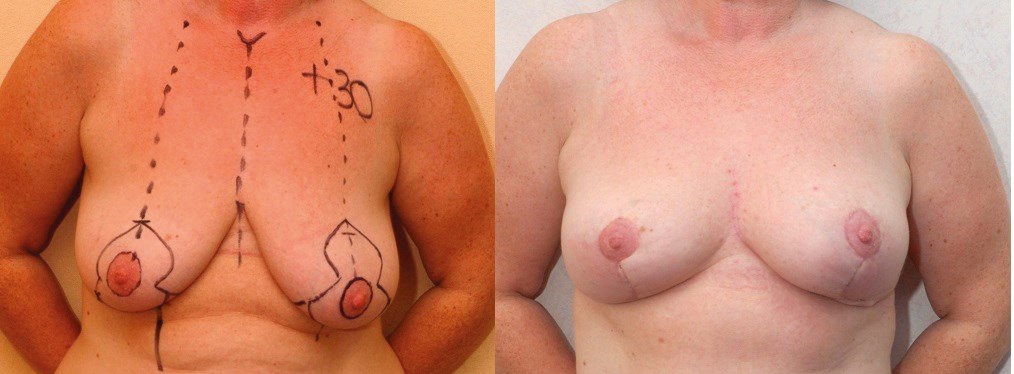
Figure 3.
Figures 1, 2 and 3 show mastopexy only, before and after.
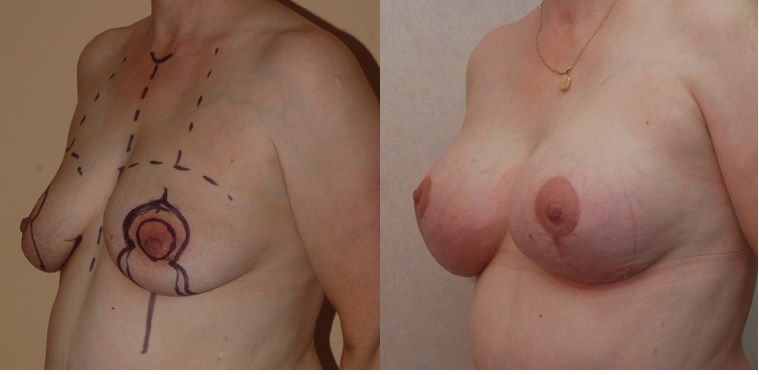
Figure 4.
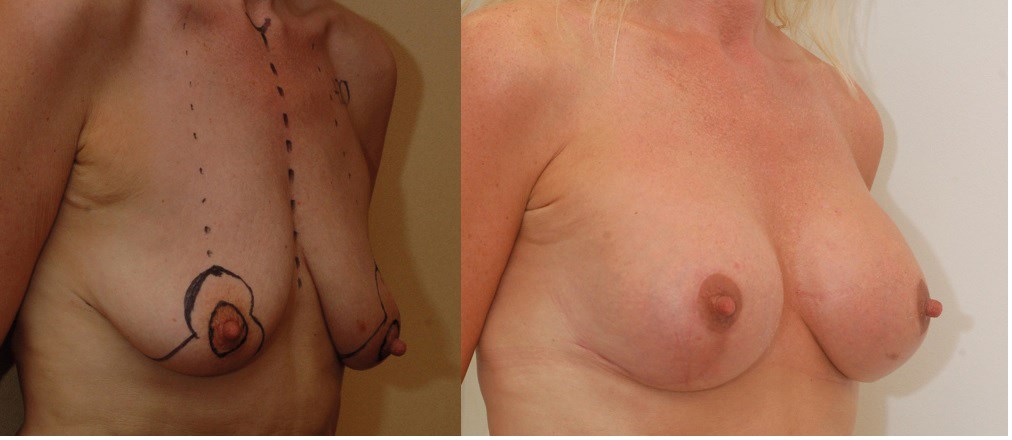
Figure 5.
Figures 4 and 5 show augmentation mastopexies, before and after.
Aftercare
After surgery, the patient is discharged when well and I have performed these procedures as day cases and as overnight stays in hospital. A post surgical bra is essential to support the breast and reduce tension on the wound and I usually recommend the patient wears this for six weeks. One of the last things I tell the patient when she is being discharged is to tell her that she will see the breast gland drop for the next six months, until the final result has been achieved.
References
1. Mallucci P, Branford OA. Concepts in aesthetic breast dimensions: analysis of the ideal breast. J Plast Reconstr Aesthet Surg 2012;65(1):8-16.
2. Tebbetts JB, Adams WP. Five critical decisions in breast augmentation using five measurements in 5 minutes: the high five decision support process. Plast Reconstr Surg 2005;116(7): 2005-16.
3. Spear S. Augmentation/Mastopexy: “Surgeon, Beware”. Plast Reconstr Surg 2003;112(3): 905-6.
4. Hall-Findlay EJ. A simplified vertical reduction mammaplasty: shortening the learning curve. Plast Reconstr Surg 1999;104(3):748-59.
Declaration of competing interests: None declared.
COMMENTS ARE WELCOME