
An understanding of the anatomy of the eyelid is essential for training in oculoplastic surgery. Active learning has been shown to increase knowledge and retention and has an advantage over passive teaching methods alone [1,2].
PlayDoh® models have been used to teach the anatomy of many structures such as the eyeball [3], heart and brain. To our knowledge, the use of 3D model creation in the teaching of eyelid anatomy has not been previously published and we present a step by step method of constructing a PlayDoh® model of the eyelid [4].
There are a variety of materials available for making models. We prefer PlayDoh® since models can be made easily and quickly, errors in creation can be rectified simply and they are distinctive because of the wide range of colours available. The PlayDoh® can potentially be reused if stored in an airtight container and is readily available at low cost. Although the models are not permanent, they will last a few months before they dry out.
Method
To create the eyelid model a maximum of twelve PlayDoh® colours are required but we have made the model satisfactorily using only eight colours, (five of a larger quantity, approximately 40g, and three of smaller amounts).
Additional tools required to create the model are:
- a wipe clean mat formed from a piece of oilcloth (approximately 30 x 35cm)
- a small rolling pin, either a purchased toy rolling pin or an approximately 25cm piece of 2.5cm diameter wooden dowel
- a kitchen knife
When preparing for large group lessons of 20-25 students, we have stored the selection of PlayDoh® pieces in small airtight plastic cartons. The model of the eyelid is created starting posteriorly from the conjunctival surface and moving anteriorly as follows:
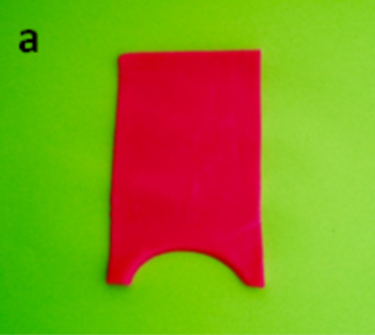
Figure 1a.
Conjunctiva (Figure 1a)
Roll out the PlayDoh® into a flat sheet and cut it into a tall rectangular shape, approximately 6 x 12cm, to represent the conjunctiva (red). Using the rim of an empty PlayDoh® tub, cut a semicircle from the inferior edge to represent the border of the conjunctiva at the superior limbus. Fold the top half of the conjunctiva over the bottom half to create the bulbar and tarsal conjunctiva joined at the superior fornix.
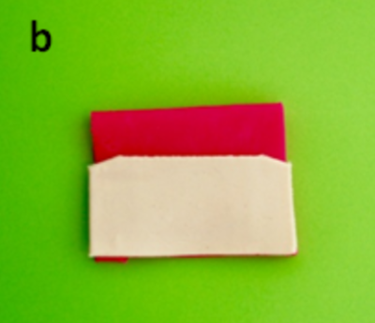
Figure 1b.
Tarsal plate (Figure 1b)
Roll out a second colour of PlayDoh® into a flat sheet and cut it so that it is the same width but vertically shorter than the conjunctiva with an arched superior border. This represents the tarsal plate (white).
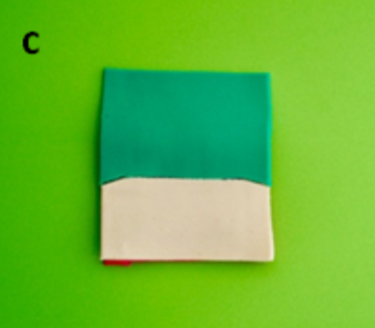
Figure 1c.
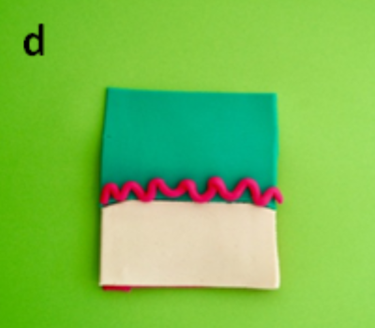
Figure 1d.
Muller’s muscle and peripheral vascular arcade (Figure 1c,d)
In a third colour, roll and cut a sheet of PlayDoh® the same width as the tarsal plate and marginally taller to represent Muller’s muscle (green) and place this at the superior border of the tarsal plate. Roll a fourth colour of PlayDoh® between the hands into a thin string and use this to represent the peripheral vascular arcade (red), which lies as a tortuous vessel on the anterior surface of Muller’s muscle, just above the tarsal plate.
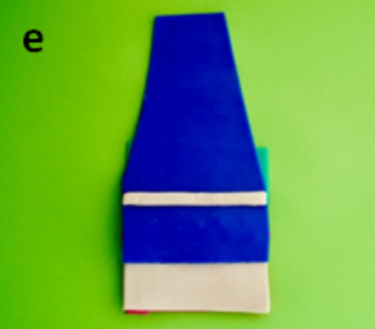
Figure 1e.
Levator muscle and Whitnall’s ligament (Figure 1e)
Roll a fifth colour of PlayDoh® into a flat sheet and cut this into a narrower levator muscle body fanning out into a wider levator aponeurosis (blue), the width of the tarsal plate. This inserts onto the anterior surface of the tarsal plate, one third of the way down.
To create Whitnall’s ligament (white), roll a wider string of PlayDoh® and flatten it into a thin strip. Place this across the portion of the levator muscle where it fans out into the aponeurosis. Muscle fibres along the long axis of the levator muscle can be scratched onto the PlayDoh® above Whitnall’s ligament.
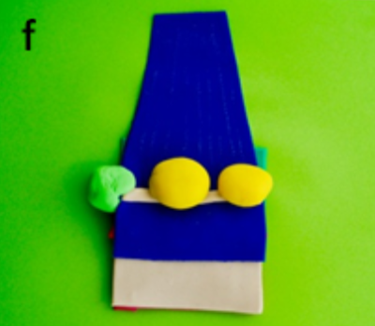
Figure 1f.
Pre-aponeurotic fat pads and lacrimal gland (Figure 1f)
At this stage decide whether to create a left or right eyelid. Use two balls of PlayDoh® to represent the smaller medial and larger central pre-aponeurotic fat pads (yellow) overlying the levator muscle and aponeurosis. A further ball of PlayDoh® forms the lacrimal gland (light green) that lies laterally in the lid and wraps around the lateral aspect of the levator, which divides it into palpebral and orbital lobes.
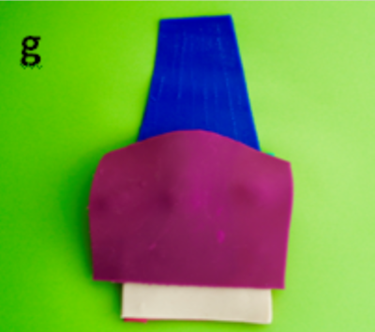
Figure 1g.
Orbital septum (Figure 1g)
The orbital septum (purple) is represented by a large rectangular sheet of PlayDoh®. It covers the lid and inferiorly blends with the front of the aponeurosis as it inserts on the tarsal plate.
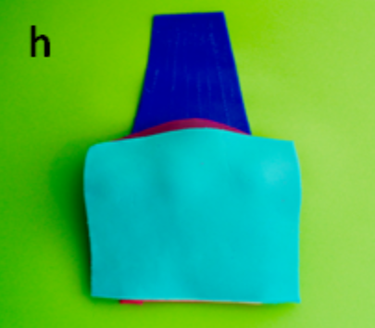
Figure 1h.
Orbicularis oculi muscle (Figure 1h)
The orbicularis oculi muscle (light blue) is formed from a further large sheet of PlayDoh® extending from the front of the inferior border of the tarsal plate (pretarsal portion), overlying the septum (pre-septal portion) and superiorly towards the orbital rim (orbital portion). Circumferential muscle fibres can be scratched onto the orbicularis muscle sheet.
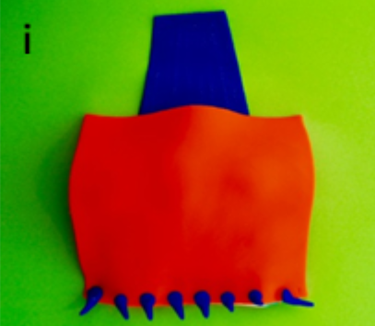
Figure 1i.
Skin and eyelashes (Figure 1i)
Roll some PlayDoh® into a large flat sheet and use this to represent the skin (orange) covering the eyelid model completely. The eyelashes (blue) are fashioned from multiple small balls of PlayDoh® rolled into conical shapes and attached to the anterior portion of the lid margin.
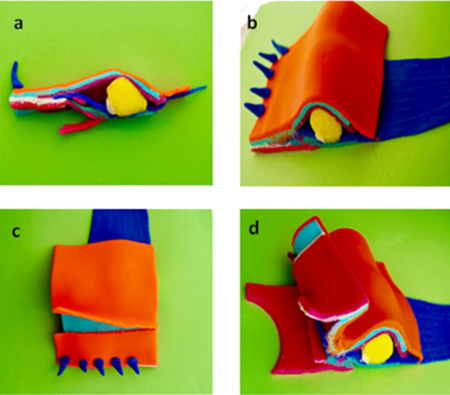
Figure 2a-d: Side-view profile of the completed PlayDoh® eyelid model,
anterior and posterior surgical approaches to the eyelid.
Eyelid lamellae and surgical approaches to the eyelid
A section can be sliced from the medial end of the completed model to show a side-view profile (Figure 2a) and an oblique view of the remainder of the model (Figure 2b). The eyelid lamellae can be clearly identified with the skin and orbicularis oculi forming the anterior lamella (orange and light blue) and the tarsus and conjunctiva forming the posterior lamella (white and red).
“PlayDoh® models are a novel and highly effective educational tool for teaching 3D anatomy of the eyelid”
Different approaches for ptosis repair can also be taught using this model and compared to clinical slides of the relevant stages of the surgical procedure. An anterior approach is illustrated (Figure 2c) with an incision through the skin crease revealing the underlying orbicularis oculi, which can then be incised to expose the top part of the tarsal plate. A posterior approach is shown next (Figure 2d) with the lid everted and an incision made through the conjunctiva at the superior border of the tarsal plate to enter the space between Muller’s muscle and the aponeurosis.
Discussion
Sound anatomical knowledge is fundamental for both physicians and surgeons alike in the treatment of patients. The traditional way of teaching anatomy has been via dissections and lectures. However these methods have disadvantages including a limited number of cadaveric specimens and relatively low effectivity of passive learning [5,6].
Kinaesthetic modes of learning, such as we have presented here, have a greater impact on short and long term learning than presentations, drawings, or purchased models [7,8]. Retention and application of knowledge is promoted when students are actively involved in their learning [9].
Creation of the eyelid model layer by layer allows a good understanding of the anatomy and relationships of the various structures of the eyelid. We have found that no prior experience with PlayDoh® is required to be able to easily construct the model.
The eyelid model can be created using a minimum of eight colours of PlayDoh® and up to twelve colours. To make the model as realistic as possible, we recommend using three extensively available colours as follows; white for tarsal plate, red for vascular arcade and yellow for preaponeurotic fat.
During our one-hour teaching session, the participants are shown how to form each structure and are asked questions about the anatomical details and function of each of these structures as they create them. Different levels of anatomical detail can be illustrated and discussed, depending on the audience.
Eftekhar et al. [10] reported some initial psychological resistance to the use of PlayDoh® in surgical training but this has not been our experience and the feedback we have received has been consistently excellent. We have used this kinaesthetic tool for several years in a variety of educational sessions, to teach eyelid anatomy to ophthalmic medical, nursing and orthoptic staff with excellent feedback (N=35; Likert scale 0-10; Mean scores = 9.43 for understanding, 9.82 for enjoyment; Median = 10) and to non-ophthalmologists such as dermatologists, maxillofacial and plastic surgeons at a facial reconstruction course (N=16; Likert scale 0-10; Mean score = 9.56; Median = 10; ranked 2nd of 13 sessions).
In summary, PlayDoh® modelling is an extremely effective way of teaching 3D anatomy and is readily available at low cost. We strongly recommend the use of this method of teaching eyelid anatomy.
Acknowledgment
Presented at the annual scientific meetings of the British Oculoplastic Surgery Society (BOPSS), Liverpool, 12-13 June 2014 and European Society of Oculoplastic and Reconstructive Surgery (ESOPRS) Budapest 11-13 September 2014.
Declaration of competing interests: None declared.
References
1. Wilke RR. The effect of active learning on student characteristics in a human physiology course for nonmajors. Adv Physiol Educ 2003;27:207–23.
2. Edgell H. Teaching Anatomy with Multiple Techniques. Teaching Innovation Projects 2011;1(1):3.
3. Manners RM, Jazayeri FR, de Bono Agius M, et al. PlayDoh® Models Are a Very Effective Kinaesthetic Tool for Teaching Anatomy of the Eye. Med Sci Educ 2017;27(4):585-8.
4. Jazayeri FA, Macleod SA, Webber SM, Manners RM. PlayDoh® models are a very effective tool for teaching eyelid anatomy. Poster presentation. ESOPRS Scientific Meeting 2014.
5. Papa V, Vaccarezza M. Teaching Anatomy in the XXI Century: New Aspects and Pitfalls. Sci World J 2013;310348.
6. Kerby J, Shukur ZN, Shalhoub J. The relationships between learning outcomes and methods of teaching anatomy as perceived by medical students. Clin Anat 2010;24(4):489-97.
7. Herur A, Kolagi S, Chinagudi A, et al. Active learning by play dough modelling in the medical profession. Adv Physiol Educ 2011;35:241-3.
8. Wheeling K. Play-Doh and 3-D apps bring neuroscience into psychiatry training. Yale Med 2014;48(3).
9. McBride JM, Drake RL. Longitudinal cohort study on medical student retention of anatomical knowledge in an integrated problem-based learning curriculum. Med Teach 2016;38(12):1209-13.
10. Eftekhar B, Ghodsi M, Ketabchi E, Ghazvini AR. Play dough as an educational tool for visualization of complicated cerebral aneurysm territory. BMC Med Educ 2005;5(1):15.
COMMENTS ARE WELCOME